Adding Another Disk to WSL2
Joe • June 2, 2021
learning wsl2 linux storageAdding Another Disk to WSL2
The Windows Subsystem for Linux has fundamentally changed how I develop projects. WSL2 providing native Ubuntu 20.04 cleanly running inside of Windows 10 has been an incredible experience. While many WSL users may be excited for WSLg; I'm just as excited about being able to Mount a VHD in WSL. VHD is a file format which represents a virtual hard disk drive. Typically these files are used with virtual machines as the file system of the virtualized operating system.
Note: At the time of this writing this feature is still in the Windows Insider builds. It may not be available on your system. Features may change upon release. Make sure you review the documentation.
My ultimate goal is to be able to move all of my ~/Code folder into a detachable volume from the WSL2 instance which would allow me to hop between WSL Linux Distributions without having to reconfigure my projects. While my interest is purely in mounting virtualized disks, you can also mount an entire physical disk into WSL as well via this same feature set in wsl.exe --mount. The --mount flag is how we're going to pass our virtualized disk connected to Windows then into WSL and exposed as any other typical disk device to Linux.
Creating a VHDx in Windows 10
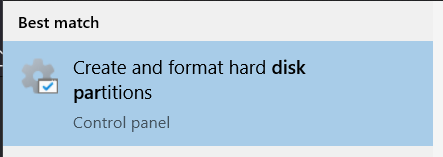
We need to create a VHDx (VHDx is the successor to the VHD format) file. Click on the Start Menu and type Disk Partitions and you should see “Create and format hard disk partitions” select this application and the Disk Management Application will launch.
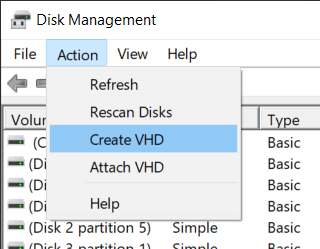
From the Disk Management window click the Action menu and select “Create VHD”:
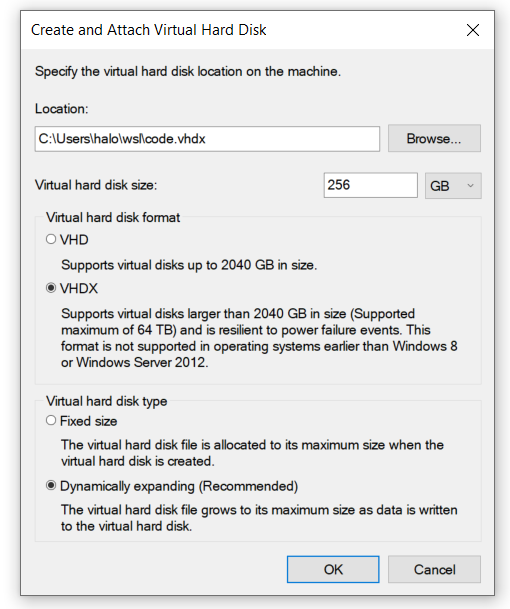
The “Create and Attach Virtual Hard Disk” window will appear and we’ll specify where we want to store our VHDx file. I’m already using a custom default distribution so I have an existing pattern of C:\Users\halo\wsl\DISKNAME.vhdx. If this is your first time feel free to store this file wherever it makes sense. Ideally on a Solid State Drive (SSD) for best performance, this will be used in real time by WSL. We’ll also specify this Virtual hard disk size to be 256 GB. This is my personal preference and I don’t mind going large when we’re going to use the Recommended Dynamically Expanding option which means the VHDx file will only take up as much space as it absolutely needs. If you would rather play conservative with your disk space you can always increase this volume later.
Click on OK and you’ll now have your VHDx created at the location you specified and it will be attached to your Windows 10 system.
We can see I now have a Disk 4 in Disk Management

Mounting a VHDx from Windows 10 to Windows Subsystem for Linux
The Disk number (4) is important as we’ll need to know the path Windows is using to reference the VHDx, which is \\.\PhysicalDrive4. We can also get this path from an elevated PowerShell console via the command Write-Output "\\.\PhysicalDrive$((Mount-VHD -Path C:\Users\halo\wsl\code.vhdx -PassThru | Get-Disk).Number)"
Remember we haven’t formatted our disk yet. It’s still a bare disk device. We’ll want to format it to the ext4 file system but we can’t do that from Windows 10. We’ll need to mount the device in WSL and then use gParted in WSL2 to create and format our ext4 partition.
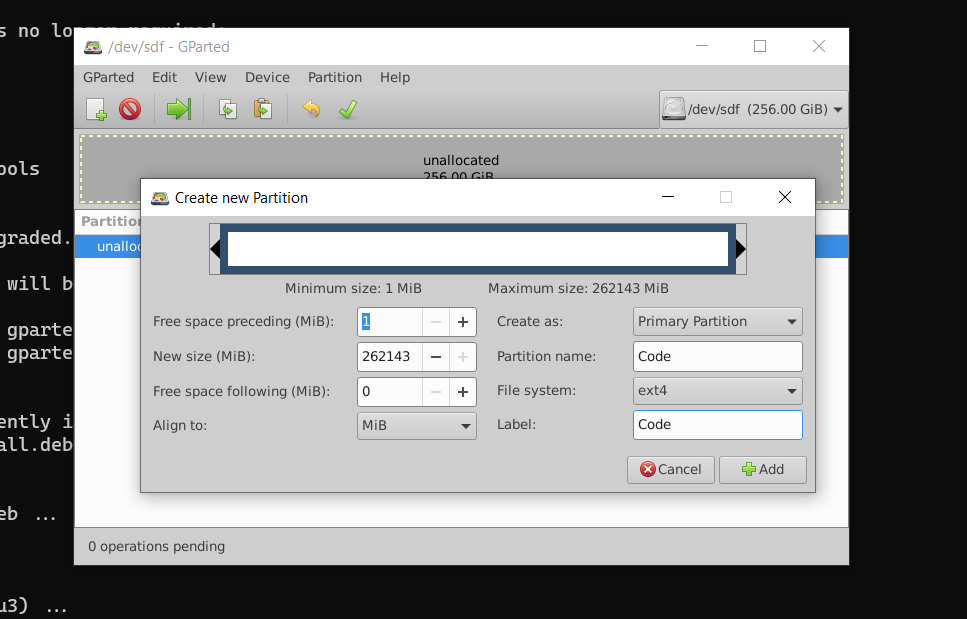
To mount the bare device (so we can partition it in WSL) we’ll use pass the --bare flag: wsl --mount \\.\PhysicalDrive4 --bare. Now we’re able to use gParted to select our device which showed up as /dev/sdf:
Once everything is complete we should see everything complete successfully in gParted. You can also use the standard Linux CLI tools if you’d rather not use gParted. With our ext4 file system created and ready to use we want to run wsl --unmount \\.\PhysicalDrive4. I assume I could have left the VHDx mounted via the --bare flag and mounted the file system from within WSL, however with this being the bleeding edge of the Insider’s Preview, I’m trying to follow the documentation so I don’t trigger any unintended or unknown side effects. We can mount a specific partition to WSL which is what I ended up doing as it felt somewhat safer than using bare.
In PowerShell:
wsl --mount \\.\PhysicalDrive4 -p 1
The disk \\.\PhysicalDrive4 was successfully mounted under the name 'PhysicalDrive4p1'. The mountpoint can be found under the path pointed to by the automount setting (default: /mnt/wsl).
To unmount and detach the disk, run 'wsl --unmount \\.\PhysicalDrive4'.
We can see that we’ve successfully mounted our first partition, let’s see what it looks like according to df -h:
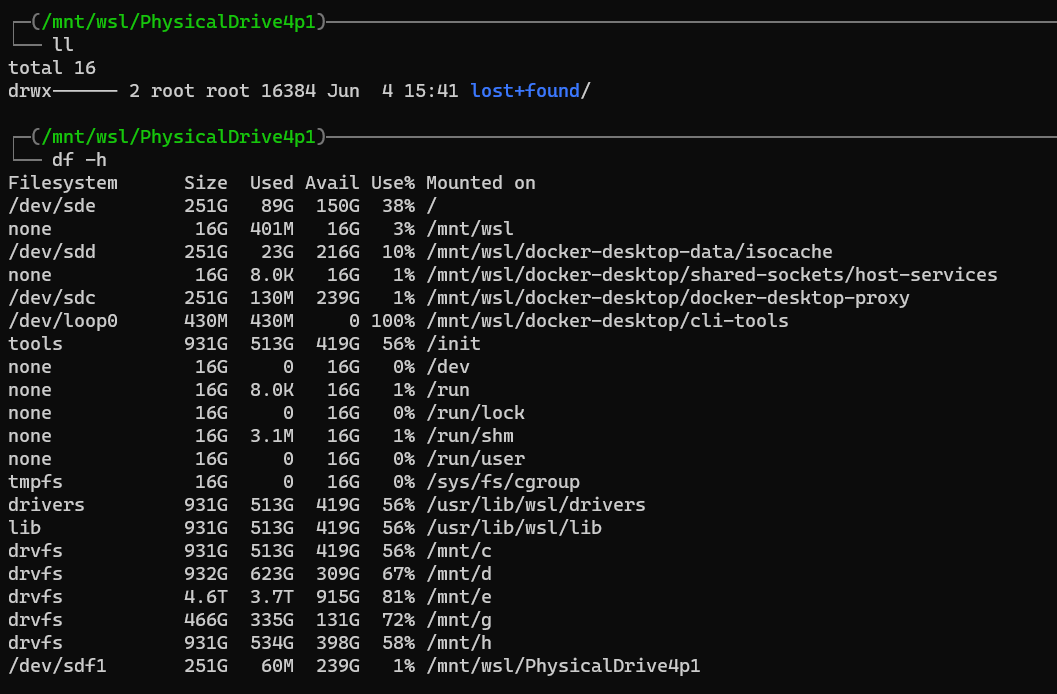
Fantastic! The next step is to copy the current contents of my ~/Codefolder to the new partition/dev/sdf1/which is being stored in myC:\Users\halo\wsl\code.vhdx` file.

For science, it took 6 minutes 34 seconds to copy ~26 GB of data from the native WSL vhdx to the Code vhdx. I’m not sure if that’s good, I certainly think it’s reasonable for my needs. Maybe there’s a performance tradeoff between mounting with bare and using Linux’s mount? I assume that’s what WSL is doing under the hood for me via --mount. This is where my expertise nose dives :D
We can inspect our vhdx file sizes, I haven’t removed ~/Code yet so I’m expecting to be able to reduce the ext4.vhdx by a good chunk once I complete that task and create a symbolic link to the folder on the VHDx from my home folder.
I hope you found this interesting. I’m excited that this enables me to easily bring my projects from WSL distro to distro without having to copy files over and over and without having to reconfigure every project on every distribution. Thanks to the WSLConf Chat Telegram members who helped me wrap my head around this!
As Seen On
Recent Posts
- PHP to Rust via Copilot
- Compiling Python 3.12 from Source Tarball on Linux
- HTML Form Processing with PHP - php[architect] Magazine August 2014
- The Workshop: Local Dev with Lando - php[architect] Magazine November 2022
- Getting back into the swing of things
- All Posts
Categories
- ansible
- apache
- applesilicon
- aws
- blackwidow
- cakephp
- community
- composer
- conferences
- copilot
- data-storage
- day-job
- devops
- docker
- fpv
- general
- github
- givecamp
- homestead
- jigsaw
- joindin
- keyboard
- laravel
- learning
- linux
- maker
- mamp
- mentoring
- music
- nonprofit
- opensource
- packages
- php
- phparch
- projects
- provisioning
- python
- razer
- rust
- s3
- security
- slimphp
- speaking
- static-sites
- storage
- testing
- tiny-whoop
- today-i-learned
- training
- ubuntu
- vagrant
- version-control
- windows
- writing
- wsl
- wsl2
- zend-zray