The Workshop: Managing LAMP with Virtualmin - php[architect] Magazine March 2020
Joe • December 10, 2020
learning phparch writing phpWarning:
This post content may not be current, please double check the official documentation as needed.
This post may also be in an unedited form with grammatical or spelling mistakes, purchase the March 2020 issue from http://phparch.com for the professionally edited version.
The Workshop: Managing LAMP with Virtualmin
Virtualmin is a web hosting and cloud computing control panel. A hosting control panel is a web-based application that runs on a server and manages all the aspects of a hosting account. This includes account information, web sites, web servers, databases, mail servers, and all the other services which ultimately work together to allow you to run your application. A lot of value I get from Virtualmin is I get to run my servers while striking a balance between wanting to control the server without having to manually perform tedious tasks like writing virtual host configurations, creating database users and managing permissions, and also managing system users.
If you’ve ever used shared hosting from a big name hosting company you’ve probably used something like Virtualmin to manage your hosting account. Parallels Plesk and cPanel are widely used control panels leveraged by hosting companies to white label a hosted service to us, the end-users looking for a place to run our web applications.
A traditional LAMP stack contains Linux, Apache, MySql, and PHP. Virtualmin also supports the LEMP stack, which substitutes Nginx for Apache. For our usage, we’re going to use Virtualmin GPL and stay close to the default options. We’ll run the Virtualmin installer, ensure we have the most recent PHP version, then we’ll walk through the important parts to get our application up and running.
You don’t have to be a “Linux Person”
You don’t have to be an expert to run your own Linux server. You just need to have enough patience to learn while doing and be vigilant when it comes to the security of the system. We’ll cover some recommendations to help you get started on your Virtualmin adventure but you should always be proactive in keeping your systems up to date and using strong passwords to protect your accounts.
Virtualmin makes it incredibly easy to get started and you can potentially get yourself into a lot of trouble if you’re not paying attention to what you’re doing. When it doubt: ask questions., the Virtualmin forums are a fantastic way to get help from the maintainers and other users. Also, Virtualmin offers support packages so you can be confident in picking Virtualmin for your business knowing help is an email away. Virtualmin supports RedHat Enterprise Linux, CentOS, and Ubuntu LTS versions.
Virtualmin comes with two user face control panels. Virtualmin is the control panel we’ll use to administer the server and manage user accounts. Usermin is another control panel designed to be end user-facing. This is where our users' will login with their lesser privileged accounts to manage their applications and configurations. Virtualmin Pro licenses allow you to white label and resell your hosting.
Setup and Installation
We’re going to use a Vagrant virtual machine to use as our server for configuring and setting up Virtualmin. Working through a virtual machine keeps us safe because the server will not be accessible to anyone outside of our local network. This also means we won’t be able to use Let’s Encrypt to create SSL certificates, but we’ll cover how it works on a live server.
Virtualmin is designed to be the first thing you install on a freshly created system. Our virtual machine is going to use the bento/ubuntu-18.04 image as our starting point. Bento images built from a collection of Packer templates. Packer by HashiCorp is a command-line utility that turns JSON into Virtual Machines. The Bento virtual machines are minimalistic by design so they are a perfect place to start our Virtualmin project. Creating our Vagrant machine will be done by running the command vagrant init bento/ubuntu-18.04 in a project folder. This will create a Vagrantfile which we need to add port forwarding. We need to share a port from our host computer (my MacBook) to our guest virtual machine (Vagrant) via port forwarding. Add config.vm.network “forwarded_port”, guest: 8080, host: 10000 anywhere after the line which starts with: config.vm.box. Save the file and we’re ready to run vagrant up. Once complete you can open an SSH shell to the virtual machine by running vagrant ssh. You’ll be the vagrant user and can run sudo su without needing a password. Now we’re the root user on a disposable virtual machine running on our host machine.
Virtualmin utilizes a handy installer script we can easily fetch to our virtual machine via wget http://software.virtualmin.com/gpl/scripts/install.sh and then execute with sudo /bin/sh install.sh where you should be greeted with “Welcome to the Virtualmin GPL installer”:

We’re using Ubuntu 18.04, which is one of the supported operating systems by Virtualmin. It’s important to ensure you’re using a supported version of Linux or else the system will not install or run properly. Virtualmin supports LTS versions of Debian, RedHat/CentOS, and Ubuntu Linux. To continue the installer we’ll enter y and we’ll get a warning and an alert about our hostname. Since we’re running in a virtual machine and haven’t specified a hostname to use, the installer is quite confused. We can use server.vm.test and continue the installer process. While this step isn’t very important because we’re running in a virtual machine it is very important that you use a fully qualified domain name (FQDN) which can resolve to your host’s IP. Be prepared for this so you don’t have to wait on DNS records to propagate when you run this process on a real server. Once we have entered our FQDN the installer is on autopilot. When it completes we need to reboot our server and connect to the Virtualmin browser interface which is located at port 10000. Connecting to the UI on a live server by using https://x.x.x.x:10000. You’ll be greeted with a warning about a self-signed certificate which you may go ahead and accept the risk and continue.
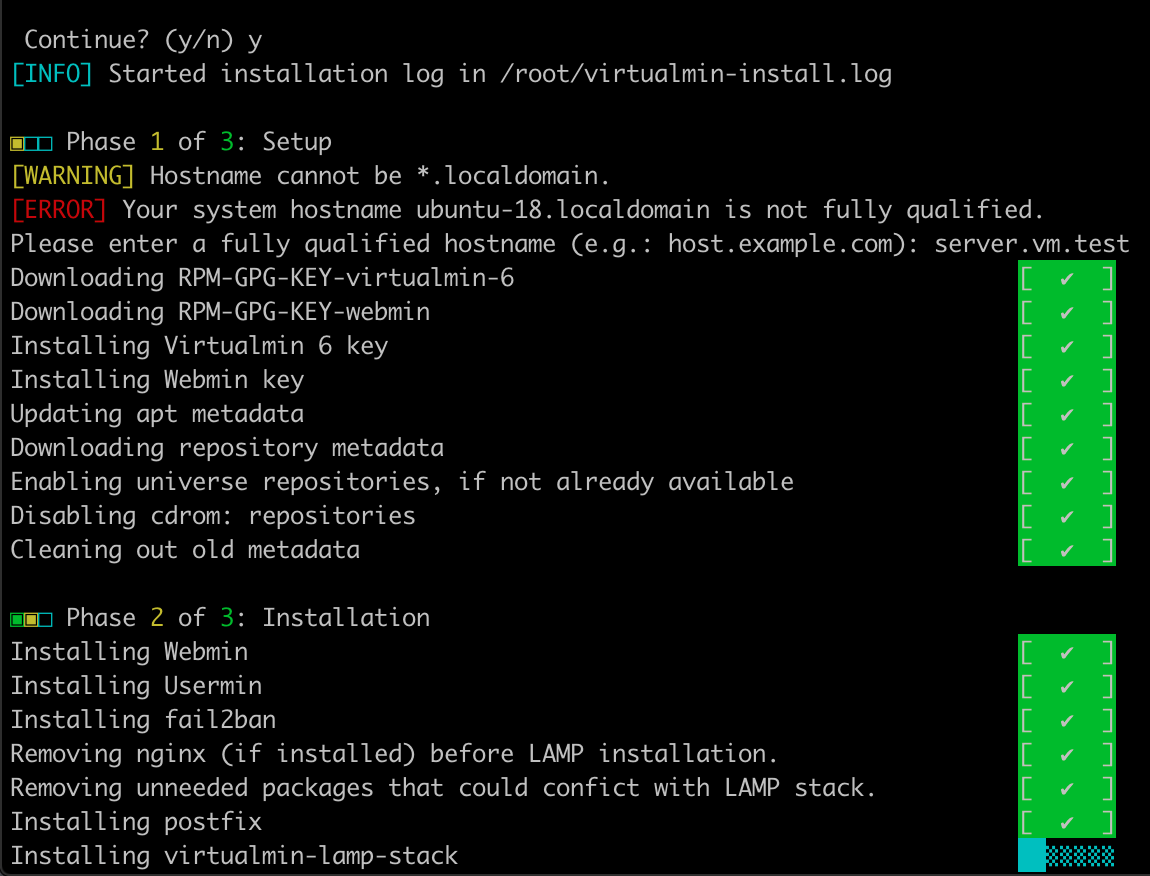
Once the installation finishes you should see output similar to:
[SUCCESS] Installation Complete!
[SUCCESS] If there were no errors above, Virtualmin should be ready
[SUCCESS] to configure at https://server.vm.test:10000 (or https://10.211.55.25:10000).
[SUCCESS] You'll receive a security warning in your browser on your first visit.
It’s safe to run exit out of the virtual machine and then run vagrant reload to restart our Virtualmin server. We’ll use the root user to log in to Virtualmin. Make sure you use a secure password as this should not be an easily guessable password! I have reset the root password to vagrant to follow in Vagrant standards since this is an insecure system. In production, I always create a fresh password and store it in a password manager such as Lastpass, KeePass, or 1Password.
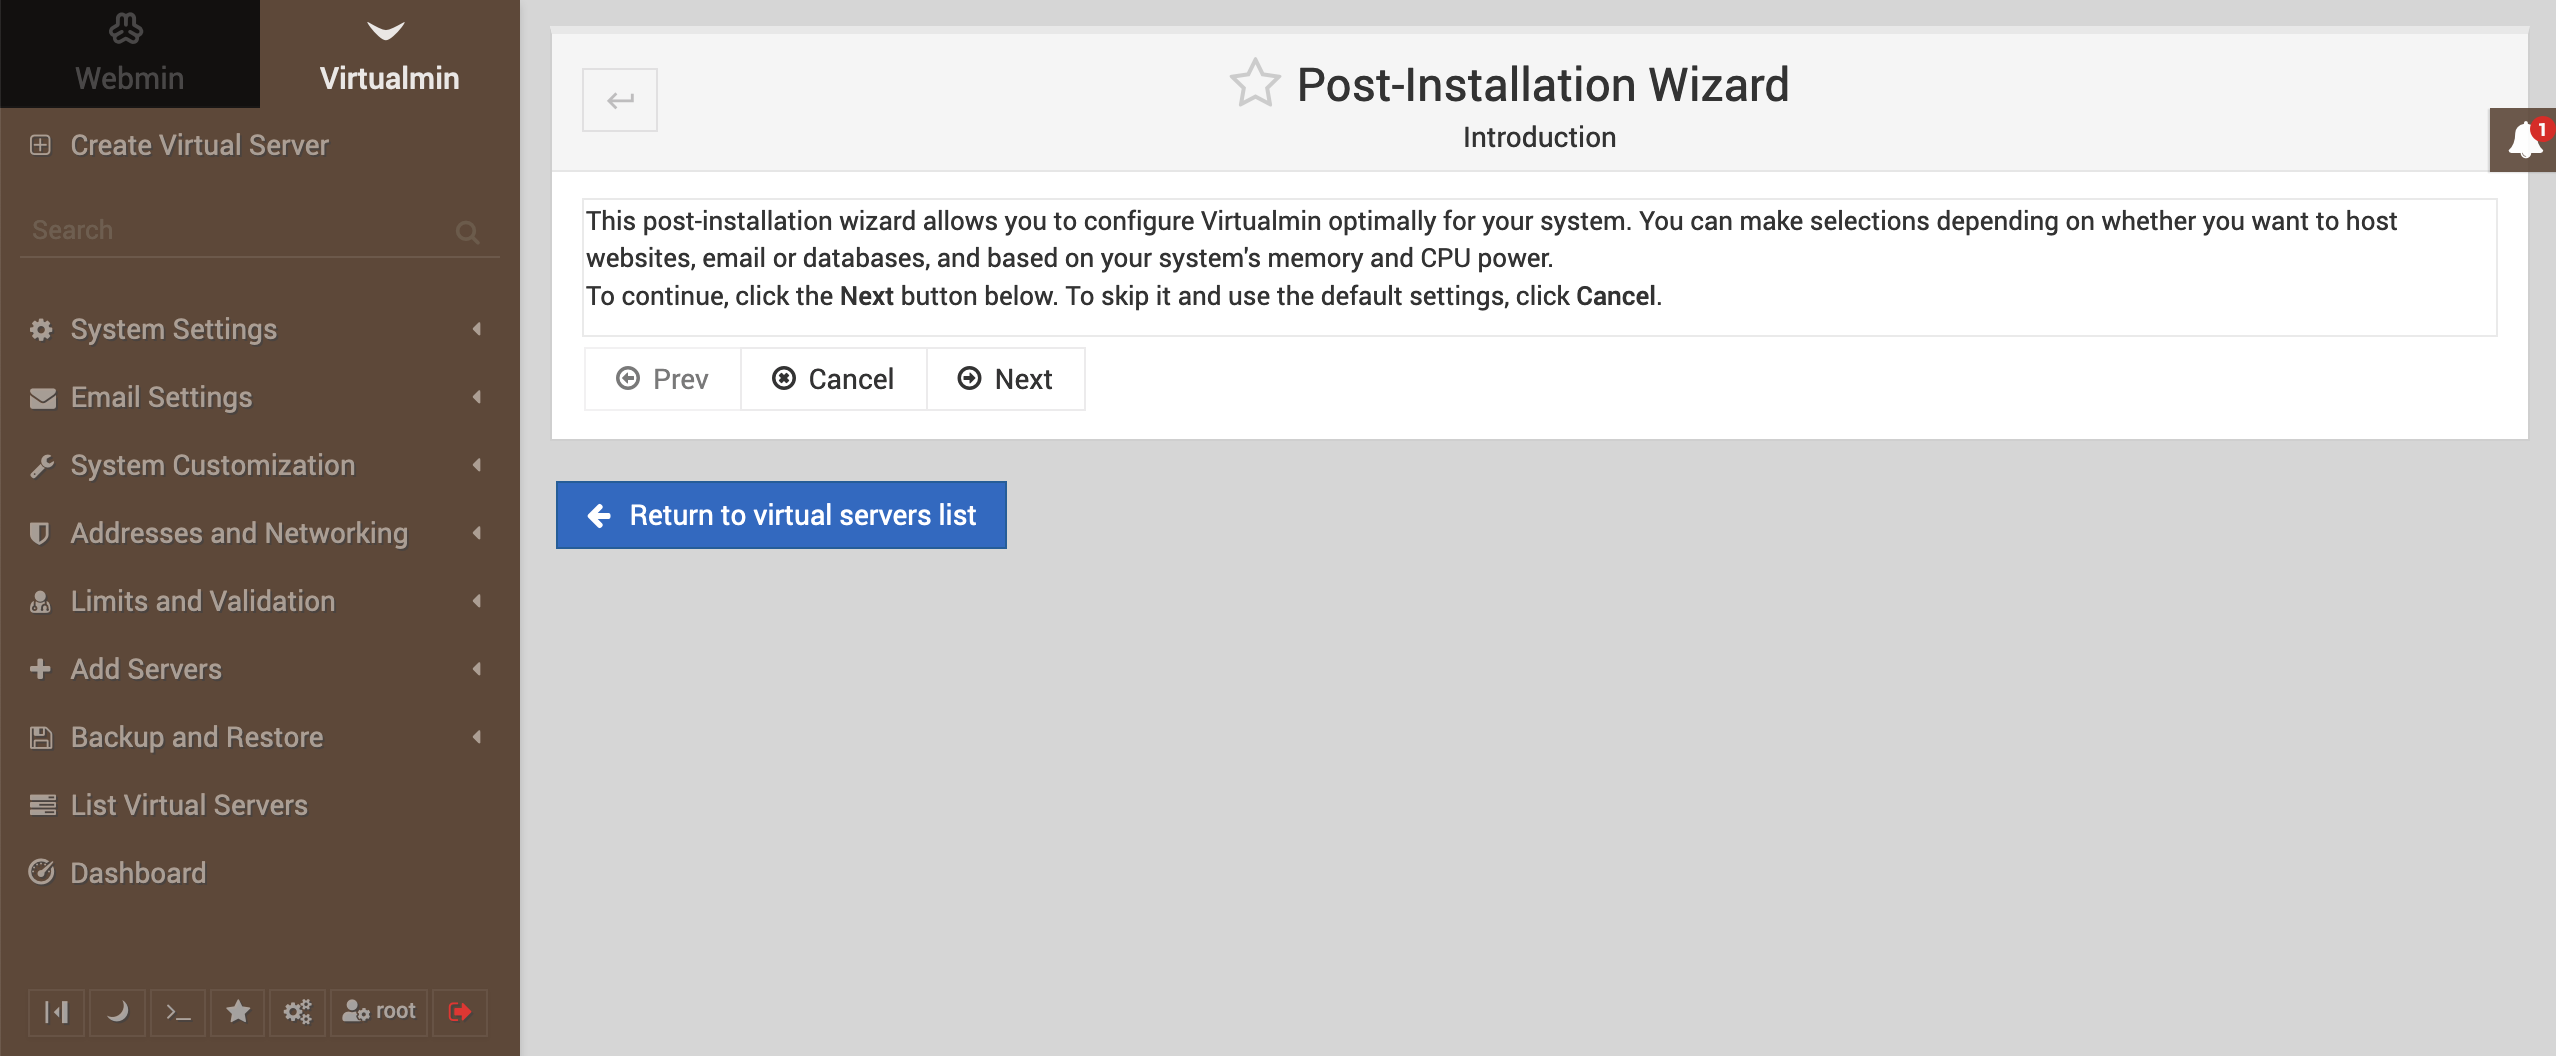
We’re greeted by the Post-Installation Wizard which will guide us through some important and final set up of our services. We’ll step through each screen and point out what should be changed if anything. Click the Next button and we’ll select our memory options.
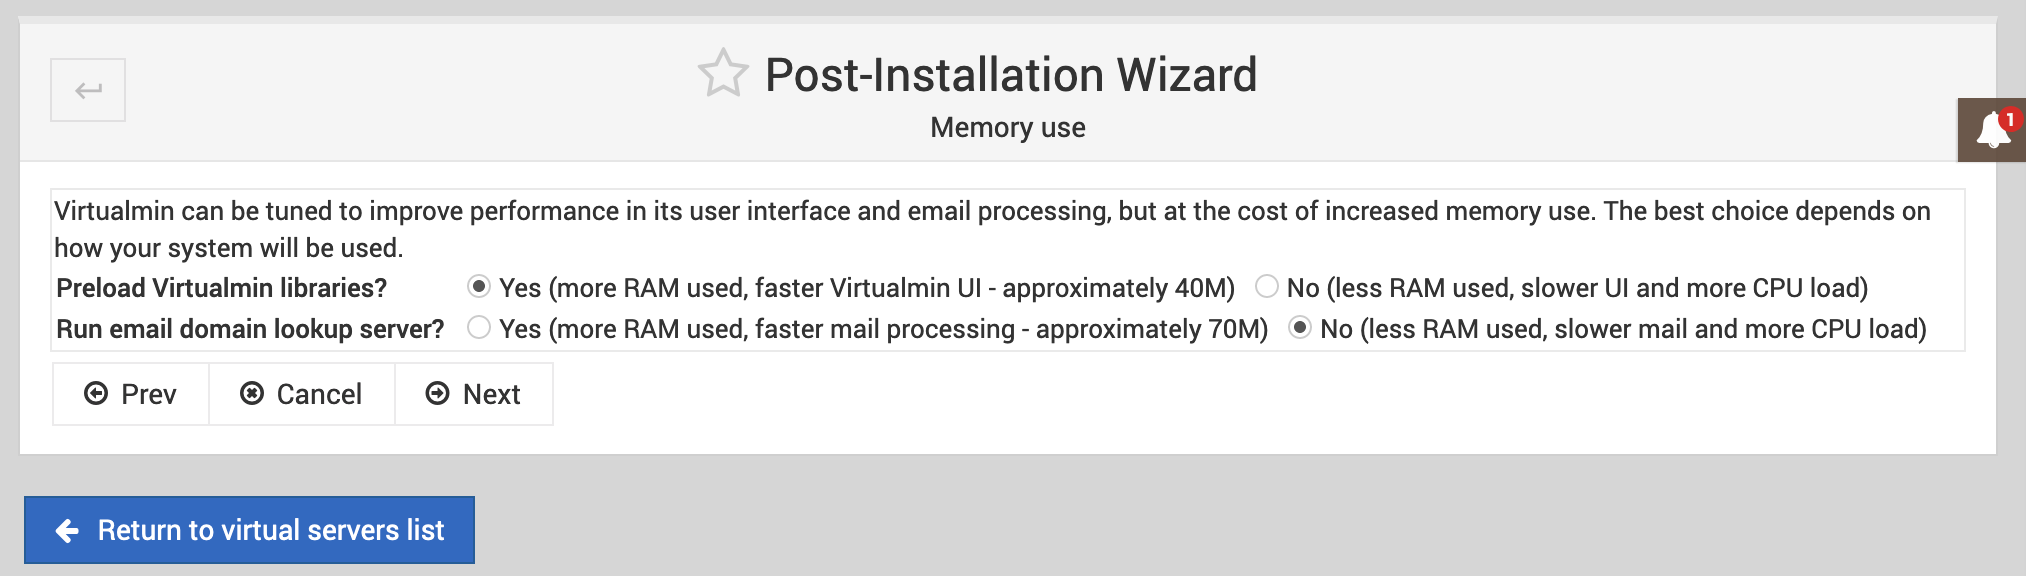
The memory options will depend on what services you’re running and how much RAM your server has. Since I’m running in a Virtual machine I’m going to select Yes to “Preload Virtualmin Libraries” so that the UI will be more responsive during our work. I’m selecting “No” to “Run email domain lookup server” because I am not Google, Microsoft, Yahoo, or some other huge tech company I have no business running email services. I strongly believe you should know your strengths and weaknesses and mine is running email servers and domain name (DNS) servers. Virtualmin will help you run these services however I avoid them. I happily pay other companies to manage mail and DNS for me. Clicking on the “Next” button will continue our post-installation wizard and show us “Virus Scanning” options. I typically enable this in production but will disable it for our virtual machine. The next screen we’ll see is the Spam filtering options. Since we’re leaving mail delivery to the experts we can leave this option disabled.
After selecting our spam filtering options we can select our “Database servers”. If you only need MySQL or PostgreSQL feel free to disable the other option. I tend to leave PostgreSQL disabled and use MySQL. Clicking “Next” will ask us to set a MySQL password. This will be for the root MySQL user so make sure to take a note of the password or save it in your password manager. The next step will adjust how much RAM MySQL will be configured to use. Since our virtual machine is quite small I’ll set this to “Medium system (512M) with regular MariaDB/MySQL use”.

Now we’ve made it to the DNS configuration and since we’re not going to be running our DNS or mail services we can check the box labeled “Skip check for resolvability” and click “Next” to continue to the most important configuration page: “Password storage”
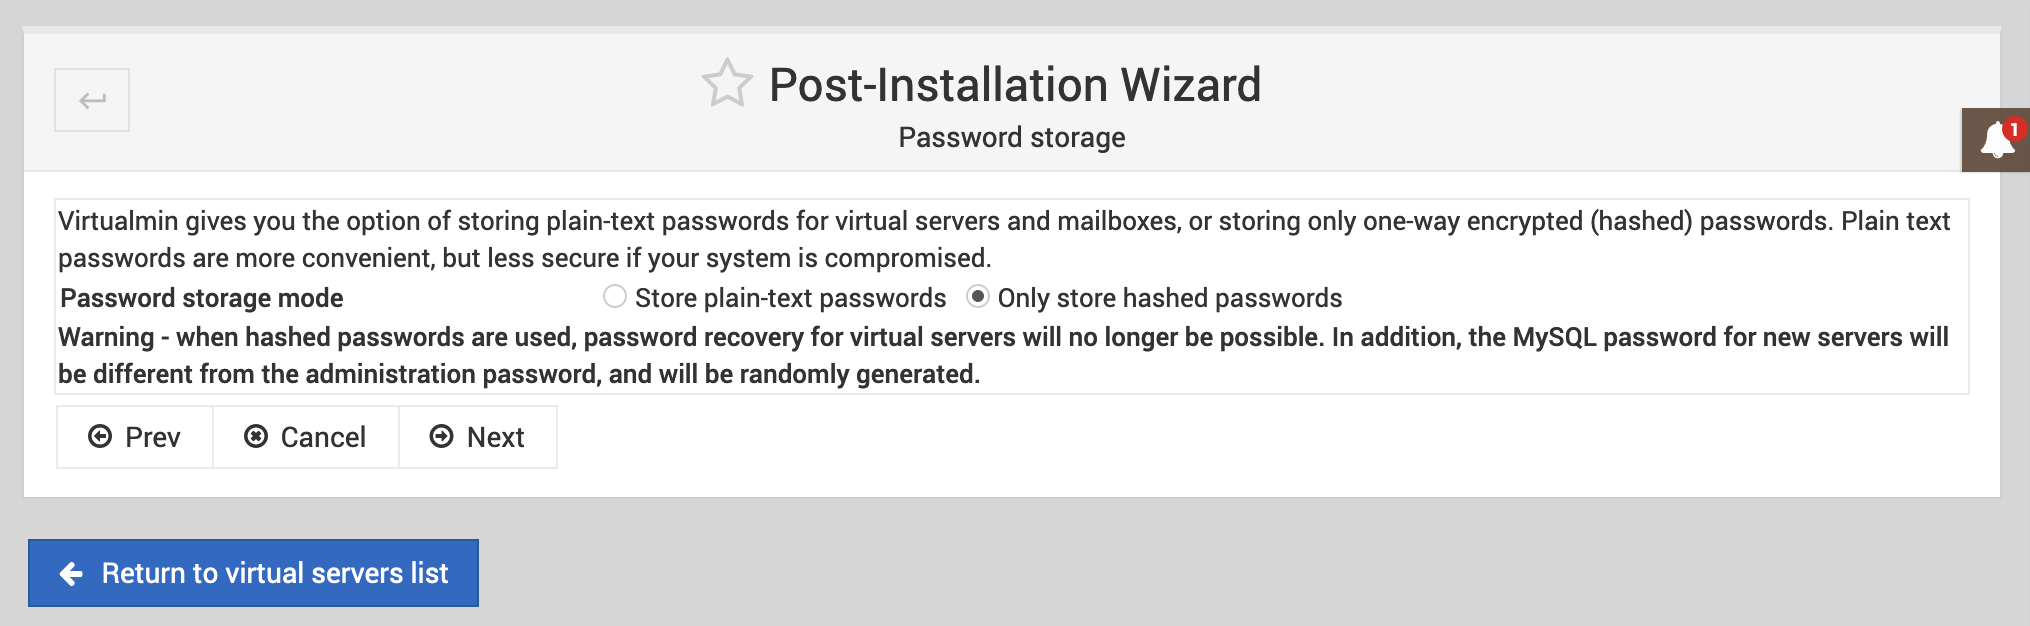
I cannot stress enough how important it is for you to select “Only store hashed passwords”. The default option is to store plain text passwords which means if your server is compromised attackers could easily reveal passwords of your users and services. The tradeoff here is by hashing passwords you will not be able to restore passwords if a user forgets their login information. Clicking “Next” will bring us to the “All done” screen and now we’re ready for the final check by clicking “Next”. Once complete you’ll be taken to the page where you can re-check the configuration. You can check your configuration at any time. We’re going to click on the “Manage Enabled Features and Plugins”:
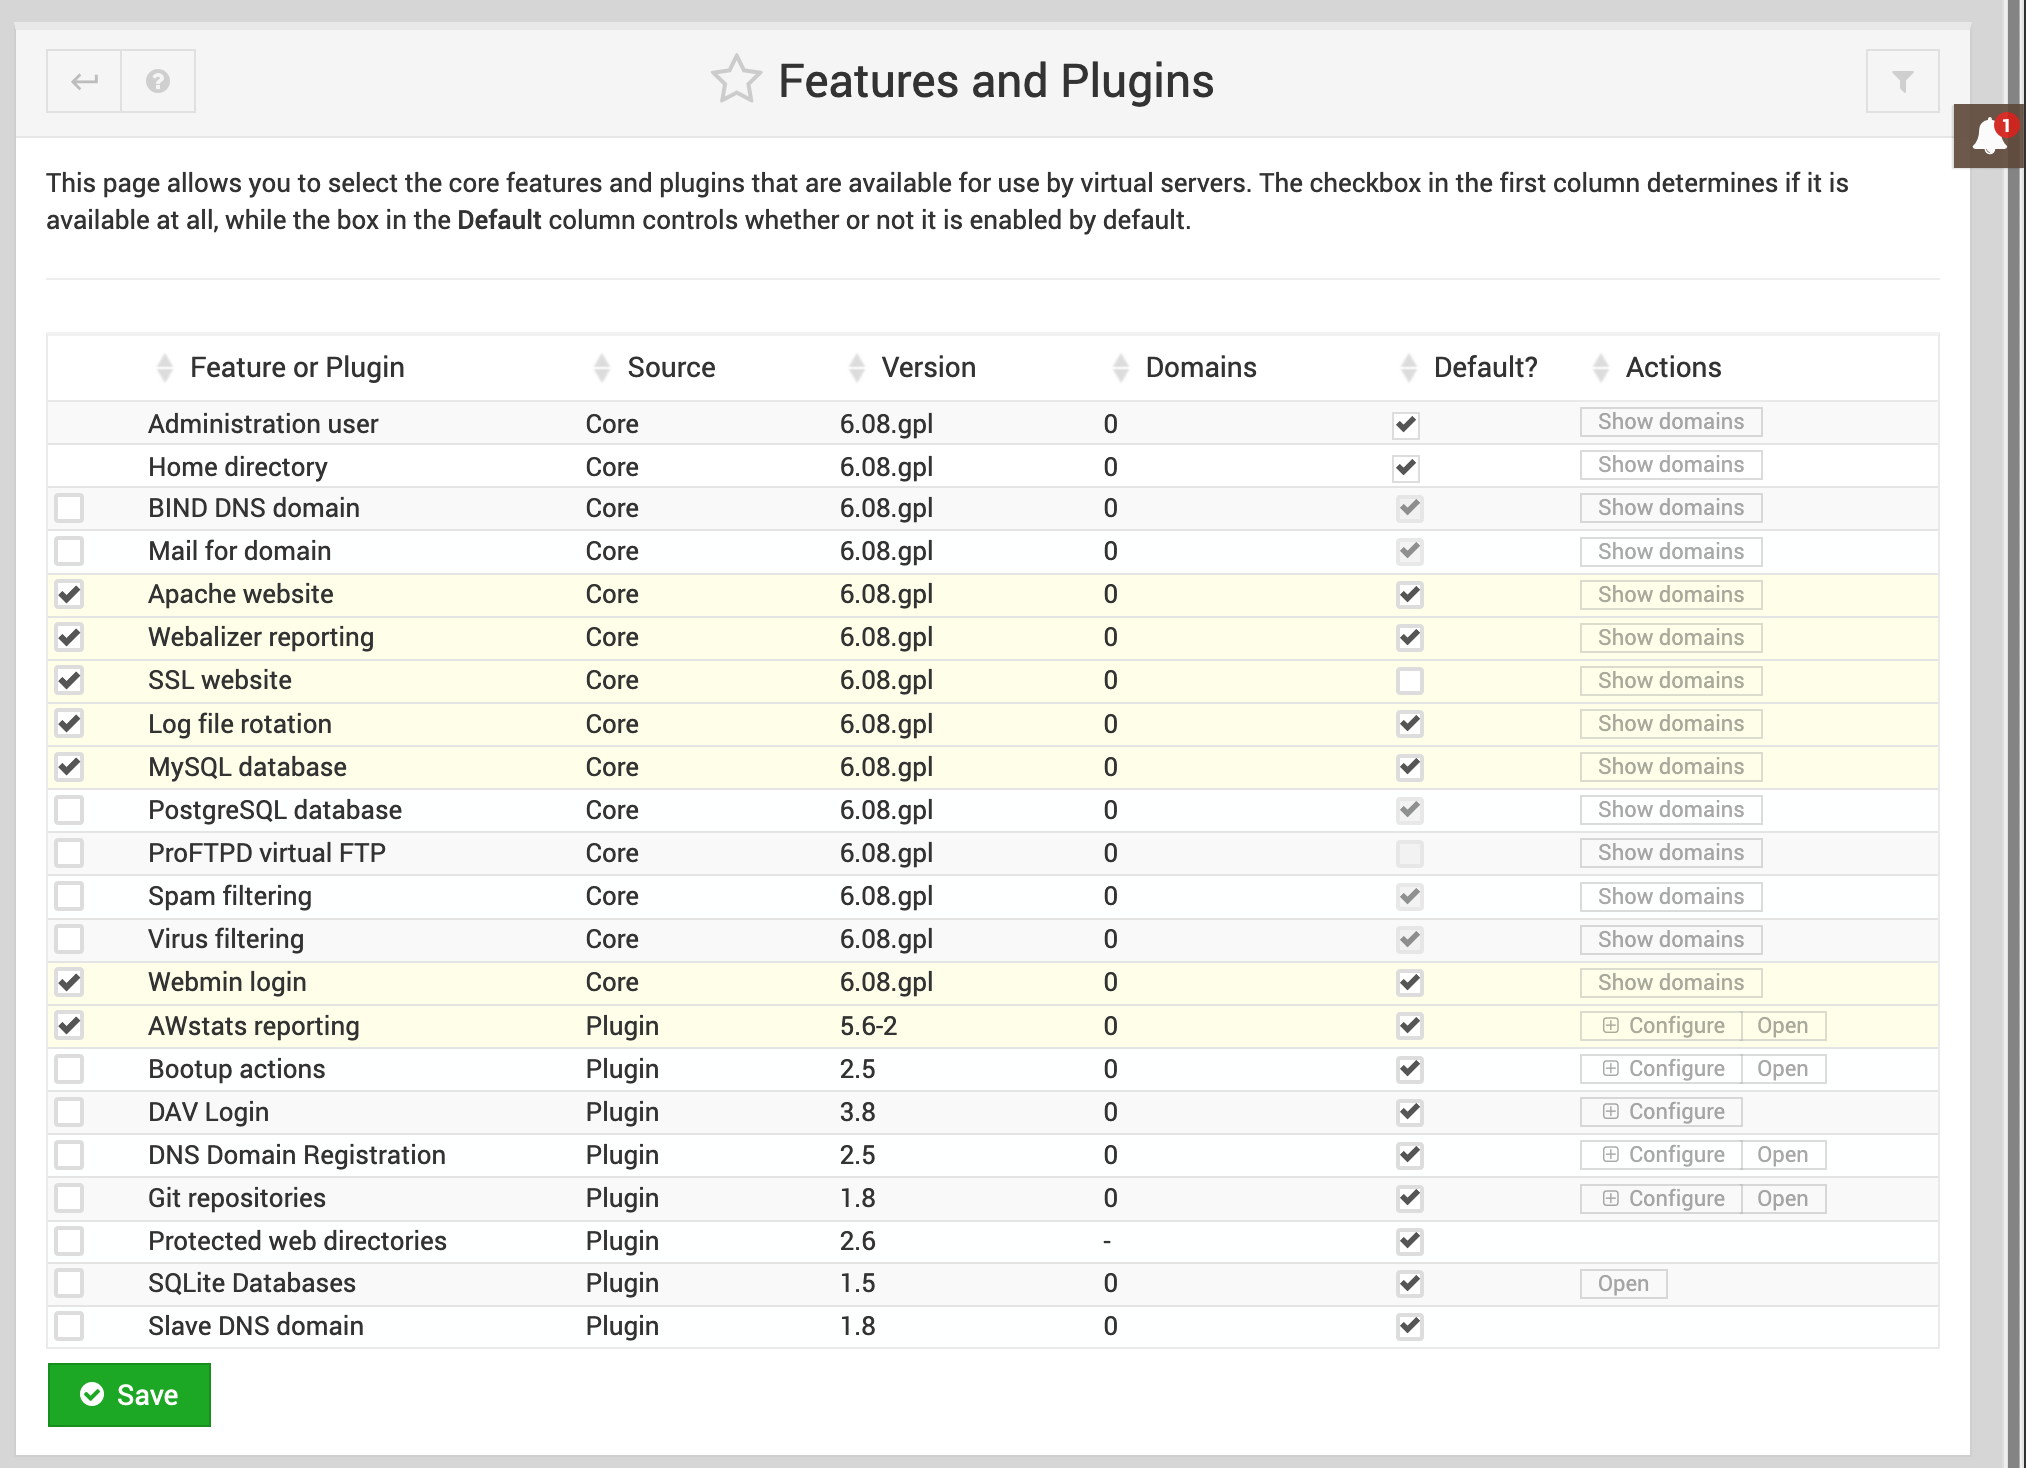
I have disabled all the services I don’t expect to run on this system. Virtualmin will disable the services which will free up some system resources. I’ve intentionally disabled ProFTPD to force users to use SFTP instead of having to deal with SSL + FTP, as well as eliminating another service we have to be responsible for. I’ve left AWStats and Webalizer enabled as these are web analytic tools that will analyze access logs to visualize traffic data to our sites. We’ll save our selections here
We’ve taken some initial steps to secure our server but it’s important to remember there isn’t such thing as a completely secure service. We need to keep the operating system and all the packages up to date. We have also disabled services we are not using to reduce the potential attack surface of our system.
By default Virtualmin ships with Fail2ban. which helps keep pesky bad people on the internet away from our server. Clicking on the Webmin icon in the top left, then expanding the Networking section will expose the “Fail2Ban Intrusion Detector” option. It should be enabled and configured to start on boot. It’s important to note that you can lock yourself out of the server by incorrectly entering passwords. If you suddenly lose access this might have been what happened. Feel free to disable this in your local testing.
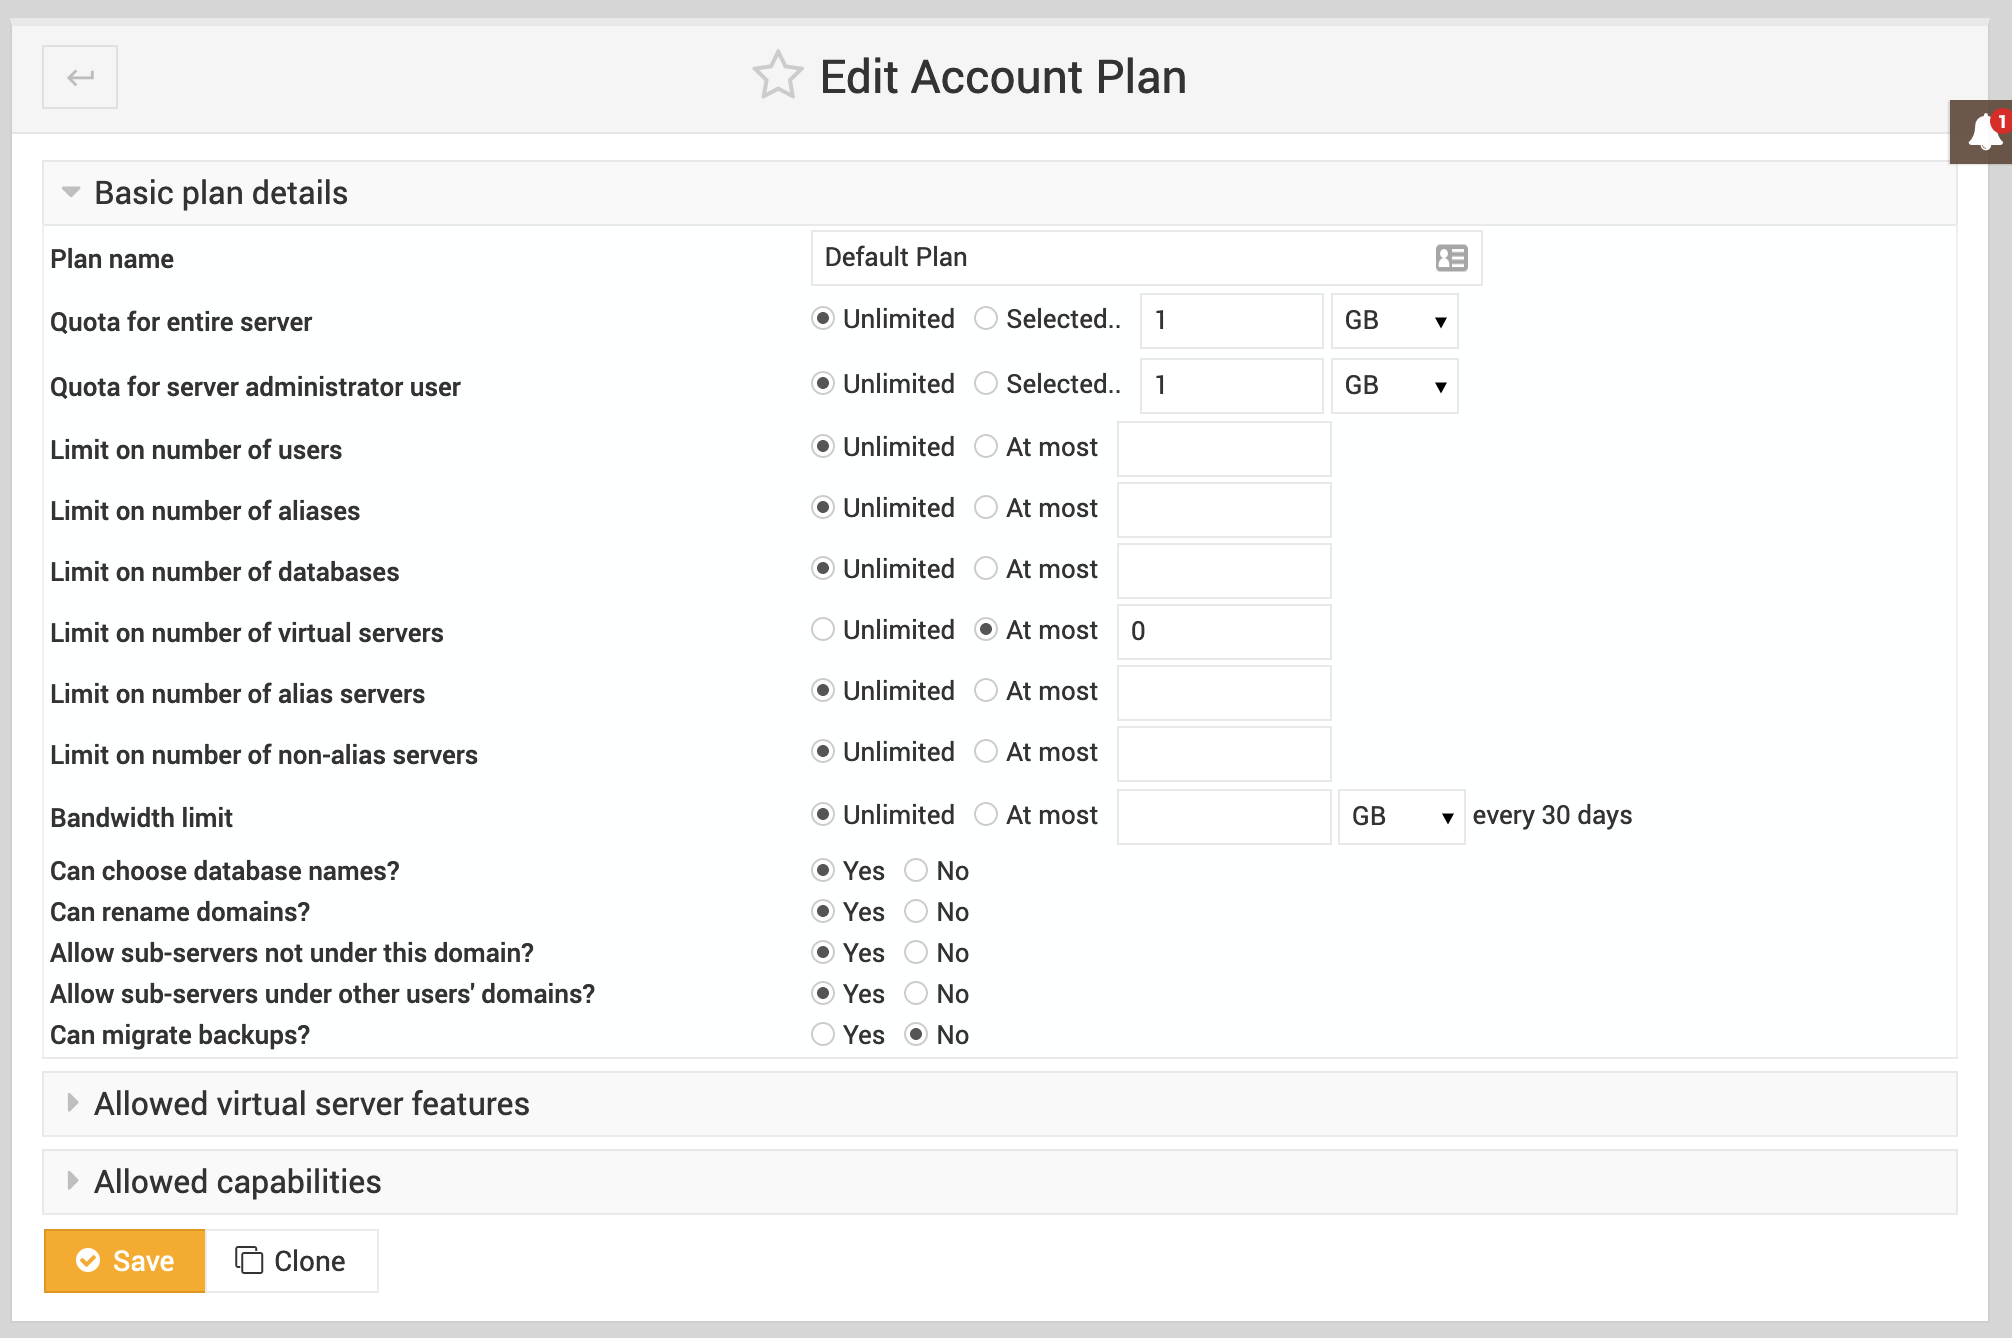
The last thing I always change in Virtualmin is the “Account Plans” Accounts are how you’ll utilize the hosting of our new server. Clicking on the Virtualmin logo in the top left then expanding “System Settings” and clicking on “Account Plans” will allow us to edit our “Default Plan”. Each domain must have an account plan. The account plan is what our newly created accounts will be able to do. The most important thing for me is to turn off the disk quota. By default, this value is set to 1GB which I often outgrow quickly. You should increase this to a reasonable number or disable this feature before we continue.
Creating Domains
We’ve installed Virtualmin, done some basic configuration now we’re ready to jump into creating a domain. A domain is essentially a web hosting account. Domains will have an FQDN associated as well as user accounts on the system including MySQL databases and passwords. Click on the “Create Virtual Server” button and we’ll create laravel.test to use as our example and create a new Laravel installation.

As Virtualmin creates our server you’ll see the actives being logged to the browser:
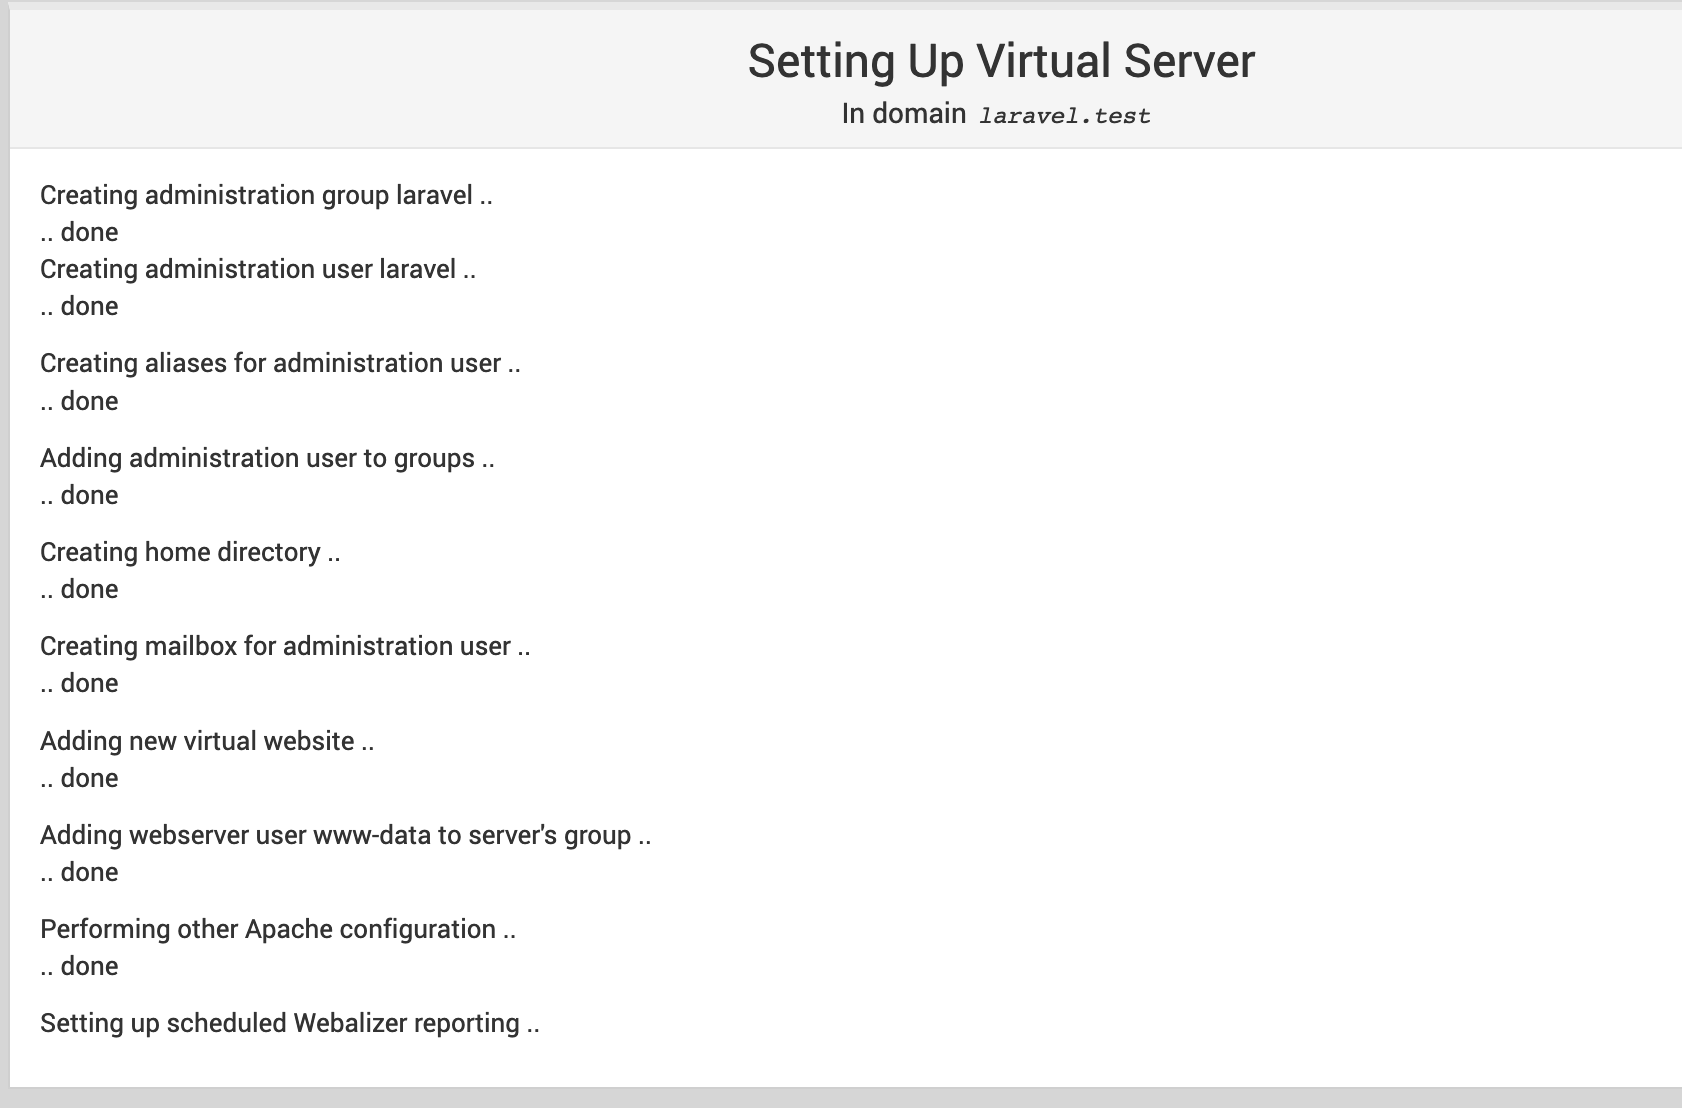
Once the virtual server has been created we can click the “Virtual Server Summary” link in the top left menu to view our server. We now have a system user named laravel who has a home folder at /home/laravel and a virtual host configured to listen for laravel.test with a webroot located at /home/laravel/public_html.
Configure PHP
Virtualmin installed PHP 7.2 from the default Ubuntu repositories which is older than we want to use. We’ll use Ondřej Surý’s Ubuntu PPA to install PHP 7.4:
$ sudo add-apt-repository ppa:ondrej/php
$ sudo apt-get install -y \
php-imagick php-memcached php-redis php7.4 php7.4-bcmath php7.4-bz2 php7.4-cgi php7.4-cli php7.4-common php7.4-curl \
php7.4-dba php7.4-dev php7.4-enchant php7.4-fpm php7.4-gd php7.4-gmp php7.4-imap php7.4-interbase php7.4-intl \
php7.4-json php7.4-ldap php7.4-mbstring php7.4-mysql php7.4-odbc php7.4-opcache \
php7.4-pspell php7.4-readline php7.4-snmp php7.4-soap php7.4-sqlite3 php7.4-sybase php7.4-tidy php7.4-xml \
php7.4-xmlrpc php7.4-xsl php7.4-zip
Once the installation is complete we’ll have PHP 7.4 installed and ready to update our Virtual Server’s configuration to use the newer version of PHP. Virtualmin will automatically pick up that we have multiple PHP versions installed and allow us to select which version we want for our domain by navigating to “Server Configuration” and clicking on “PHP Versions”:
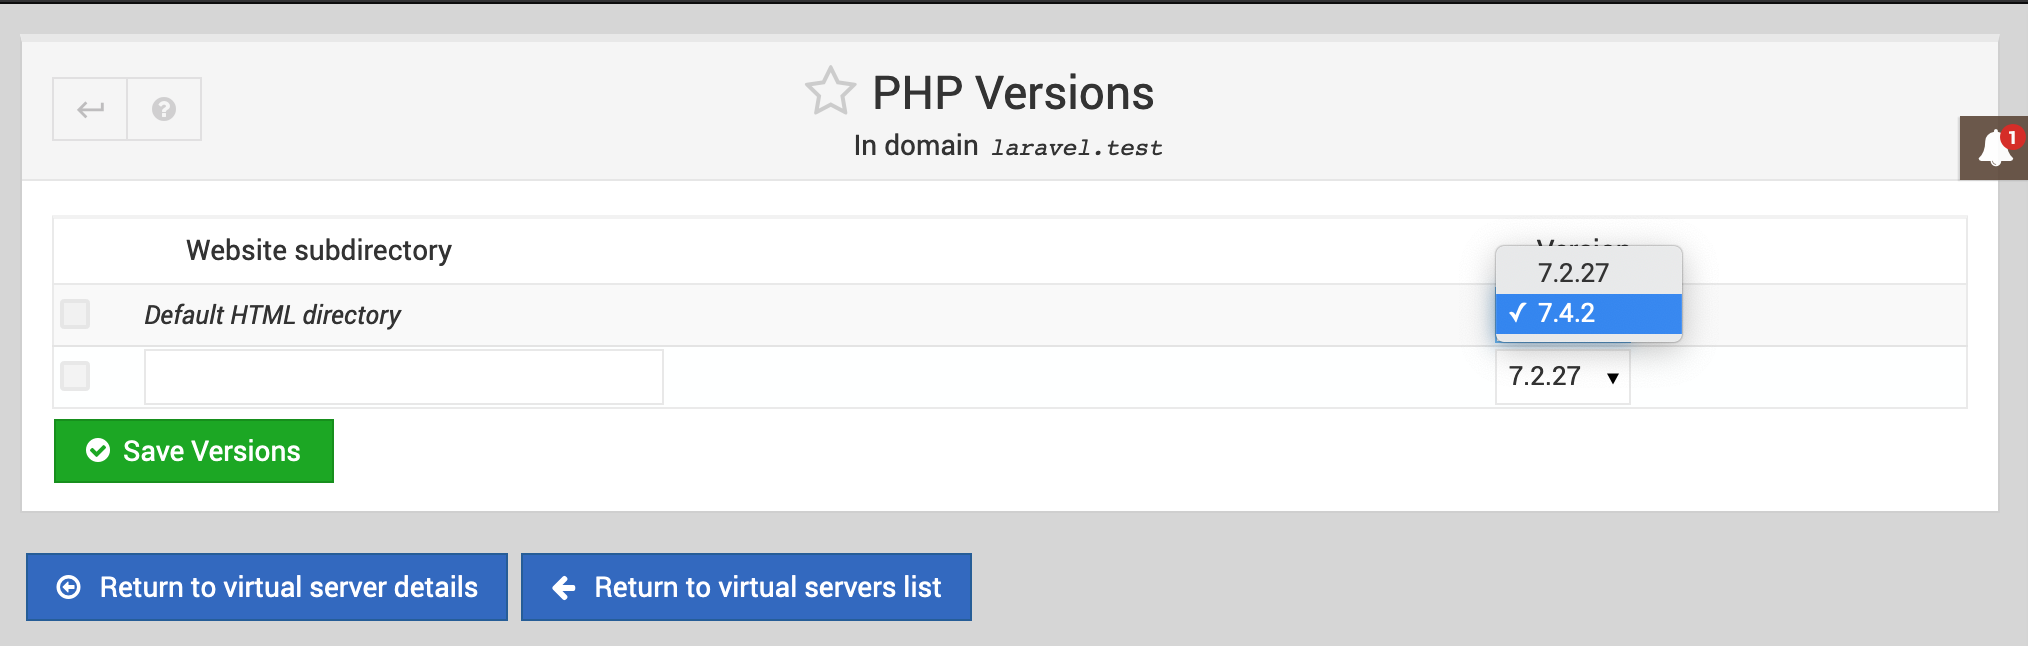
We’ll select our freshly installed PHP 7.4 and click “Save Versions” Now laravel.test will be running PHP 7.4 and we can create a file at /home/laravel/public_html/index.php containing <?php phpinfo(); and view our site in our browser. (Make sure you add an entry in your /etc/hosts file to point larvavel.test to your Virtualmin IP address.) If we view http://laravel.test in our browser we should see our PHP info dump:
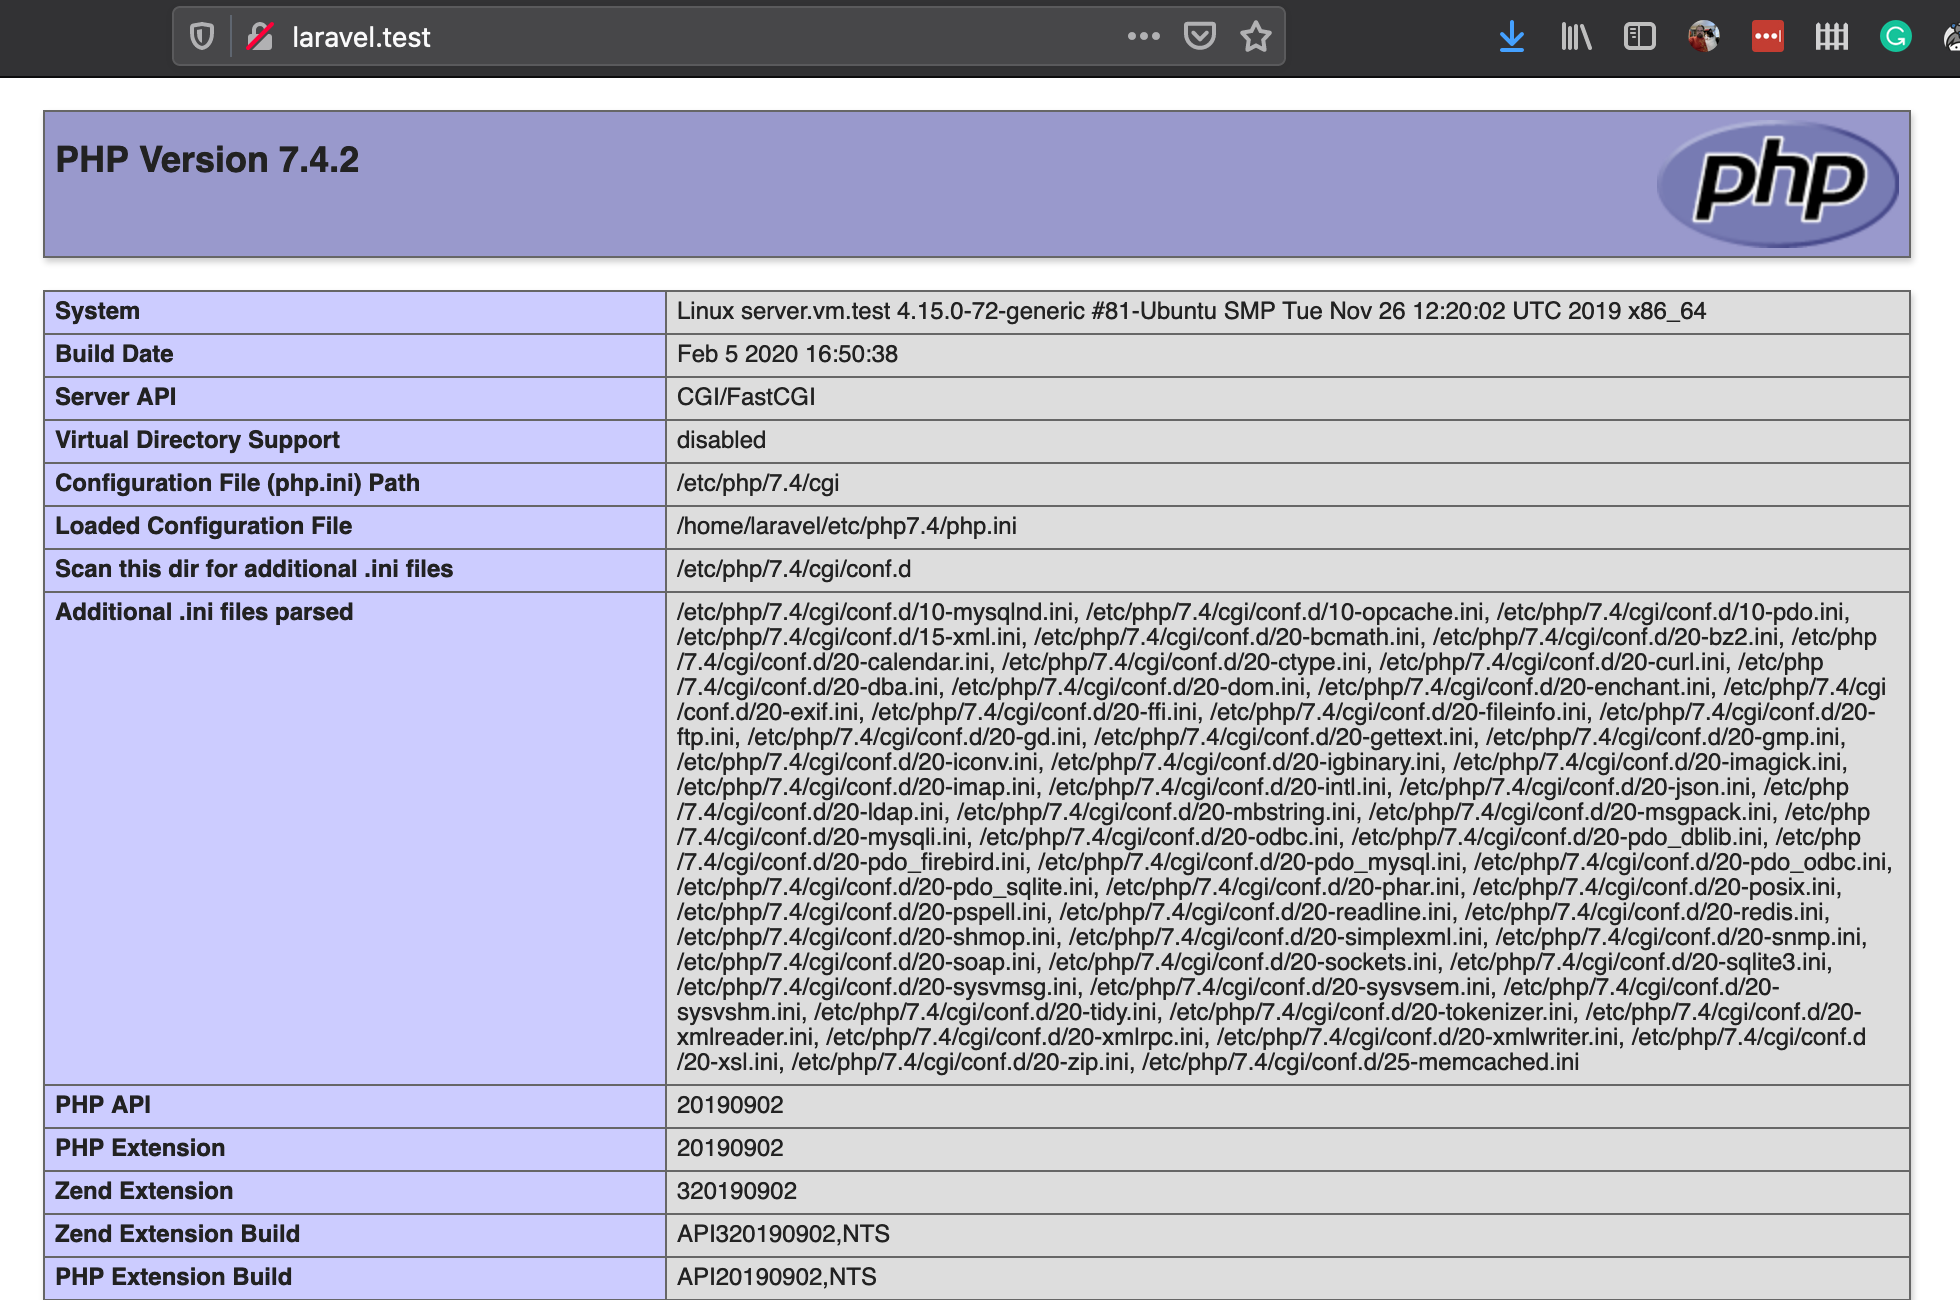
Great! PHP is installed and working and we haven’t had to touch a single INI file OR virtual host configuration file.
Our next step is to install Composer so we can pull in dependencies and create our Laravel project. via composer create-project --prefer-dist laravel/laravel blog in the home folder of our laravel user.
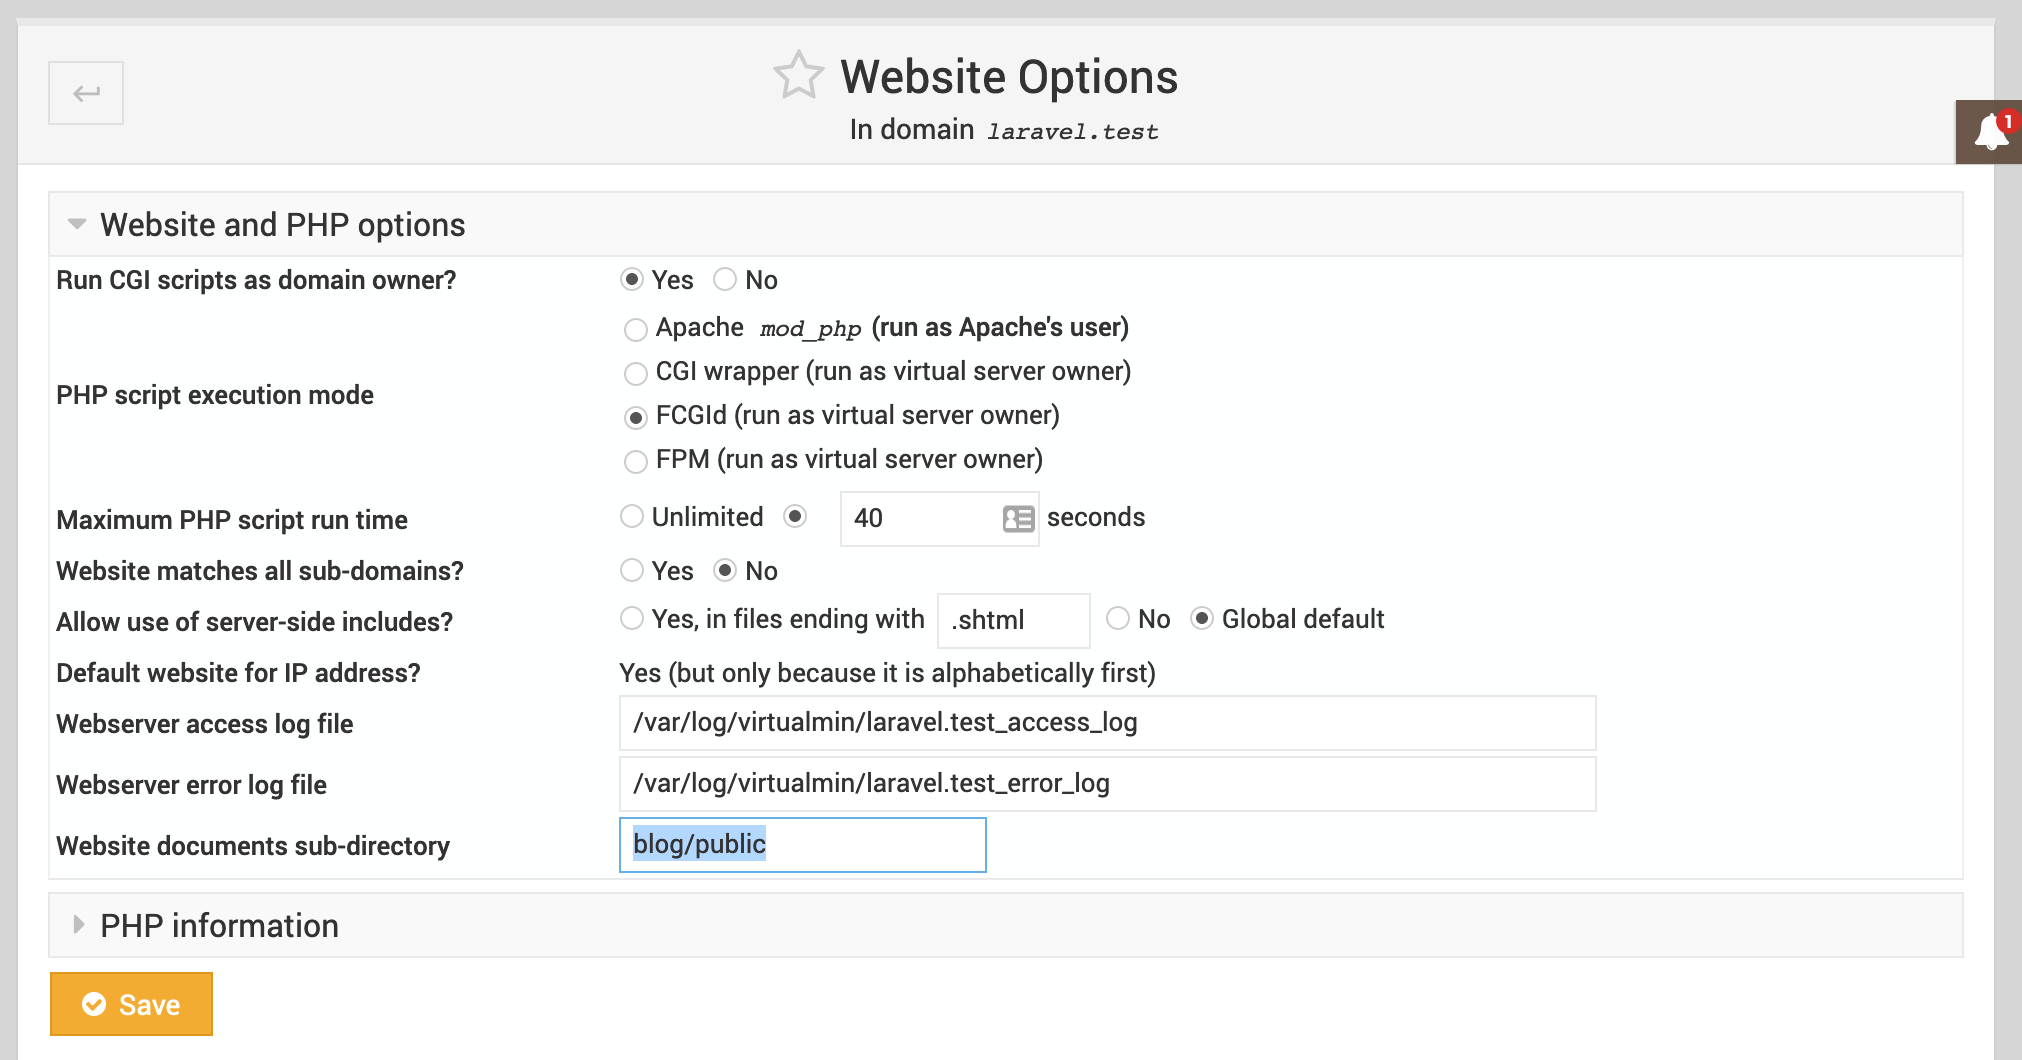
We have an issue though since Virtualmin has setup ~/public_html as our site’s document root. We can easily change this in Virtualmin’s UI via “Server Configuration” then “Website Options”. We can update our “Website documents sub-directory” from public_html to blog/public which is the name of the Laravel project we just created with Composer.
Instead of creating a new project you likely will want to clone a repository down to the user to set up your application. You should create SSH keys for your Virtualmin laravel user if you plan on using this server. Add the SSH key to your Github/Gitlab/Other account and you’ll be able to clone the repo just as you would as your normal user.
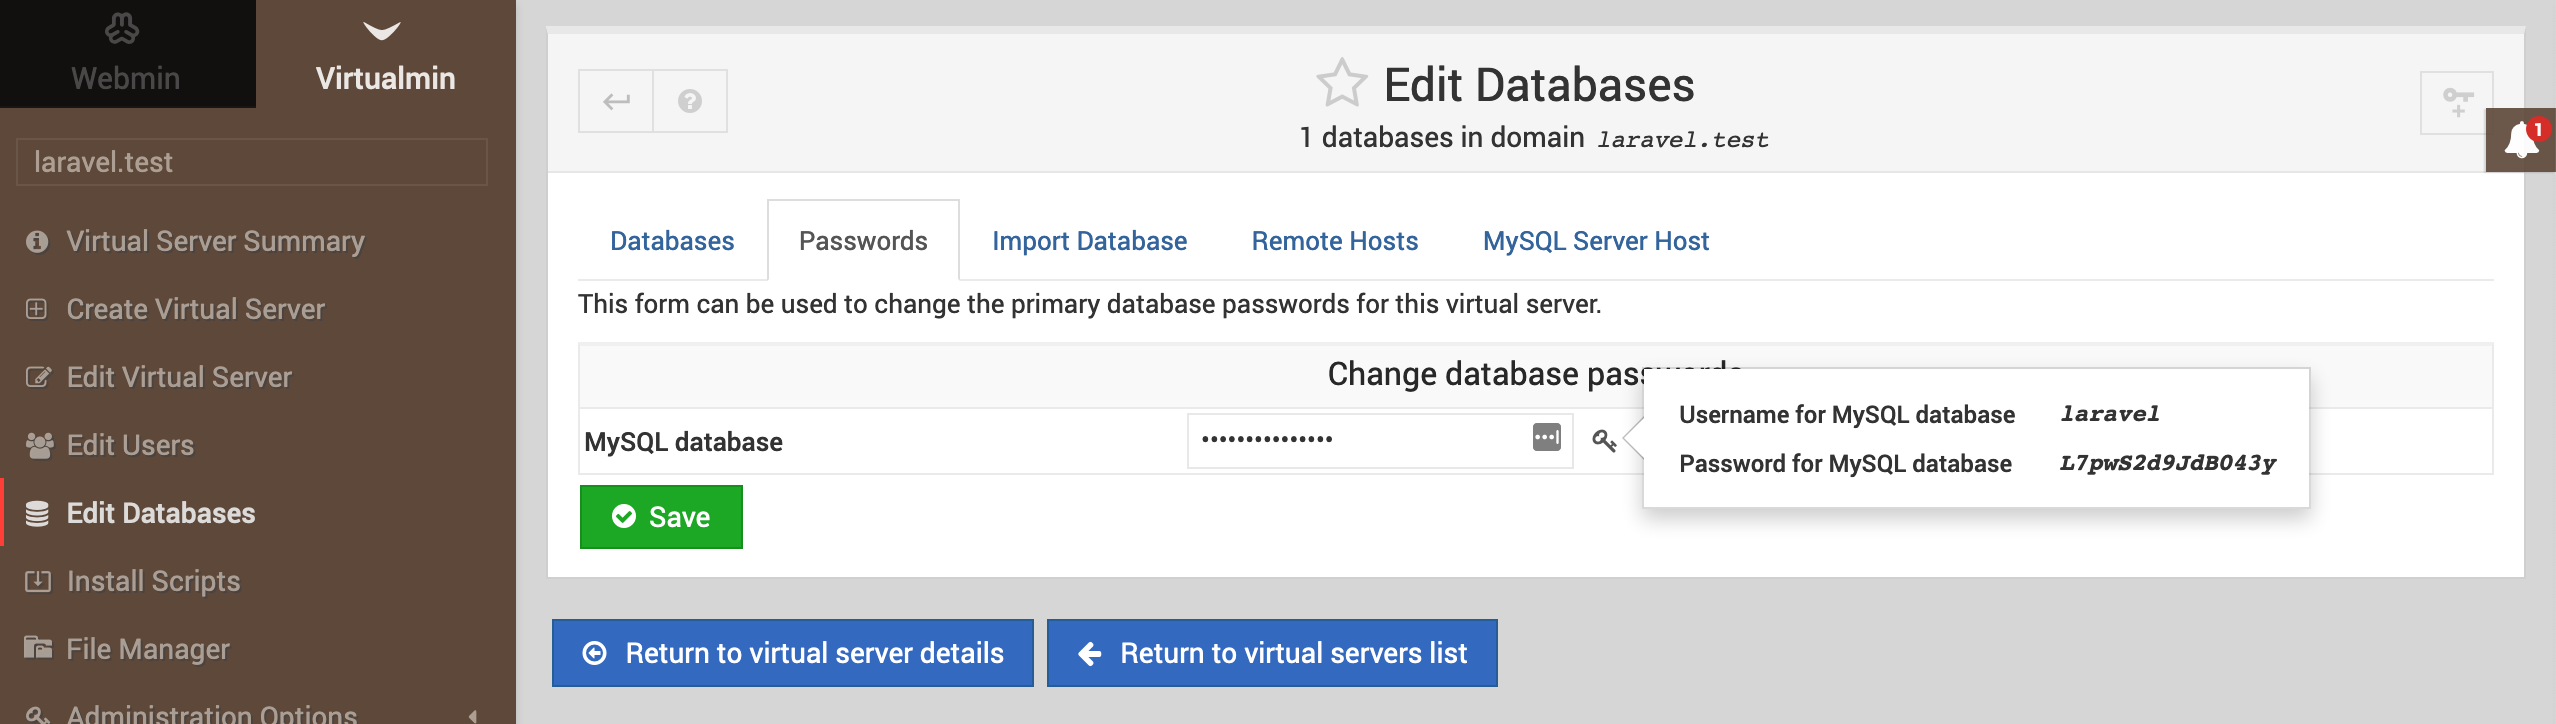
You can find your domain’s MySQL credentials by clicking on “Edit Databases” and clicking the “Passwords” tab, then clicking the key icon to reveal the user credentials.
The last thing to cover is how easy it is to get SSL certificates via Let’s Encrypt’s Certbot. Virtualmin has already installed Certbot so all we need to do is edit our Virtual Server to create the certificates and set the renewal period. We can’t do this in our local virtual machine because the domain needs to be reachable across the internet for Certbot to issue our certificate. We can look at csiphp.com (created by the former Memphis PHP User Group Leader Jeremy Kendall) which is a site I host on Virtualmin:
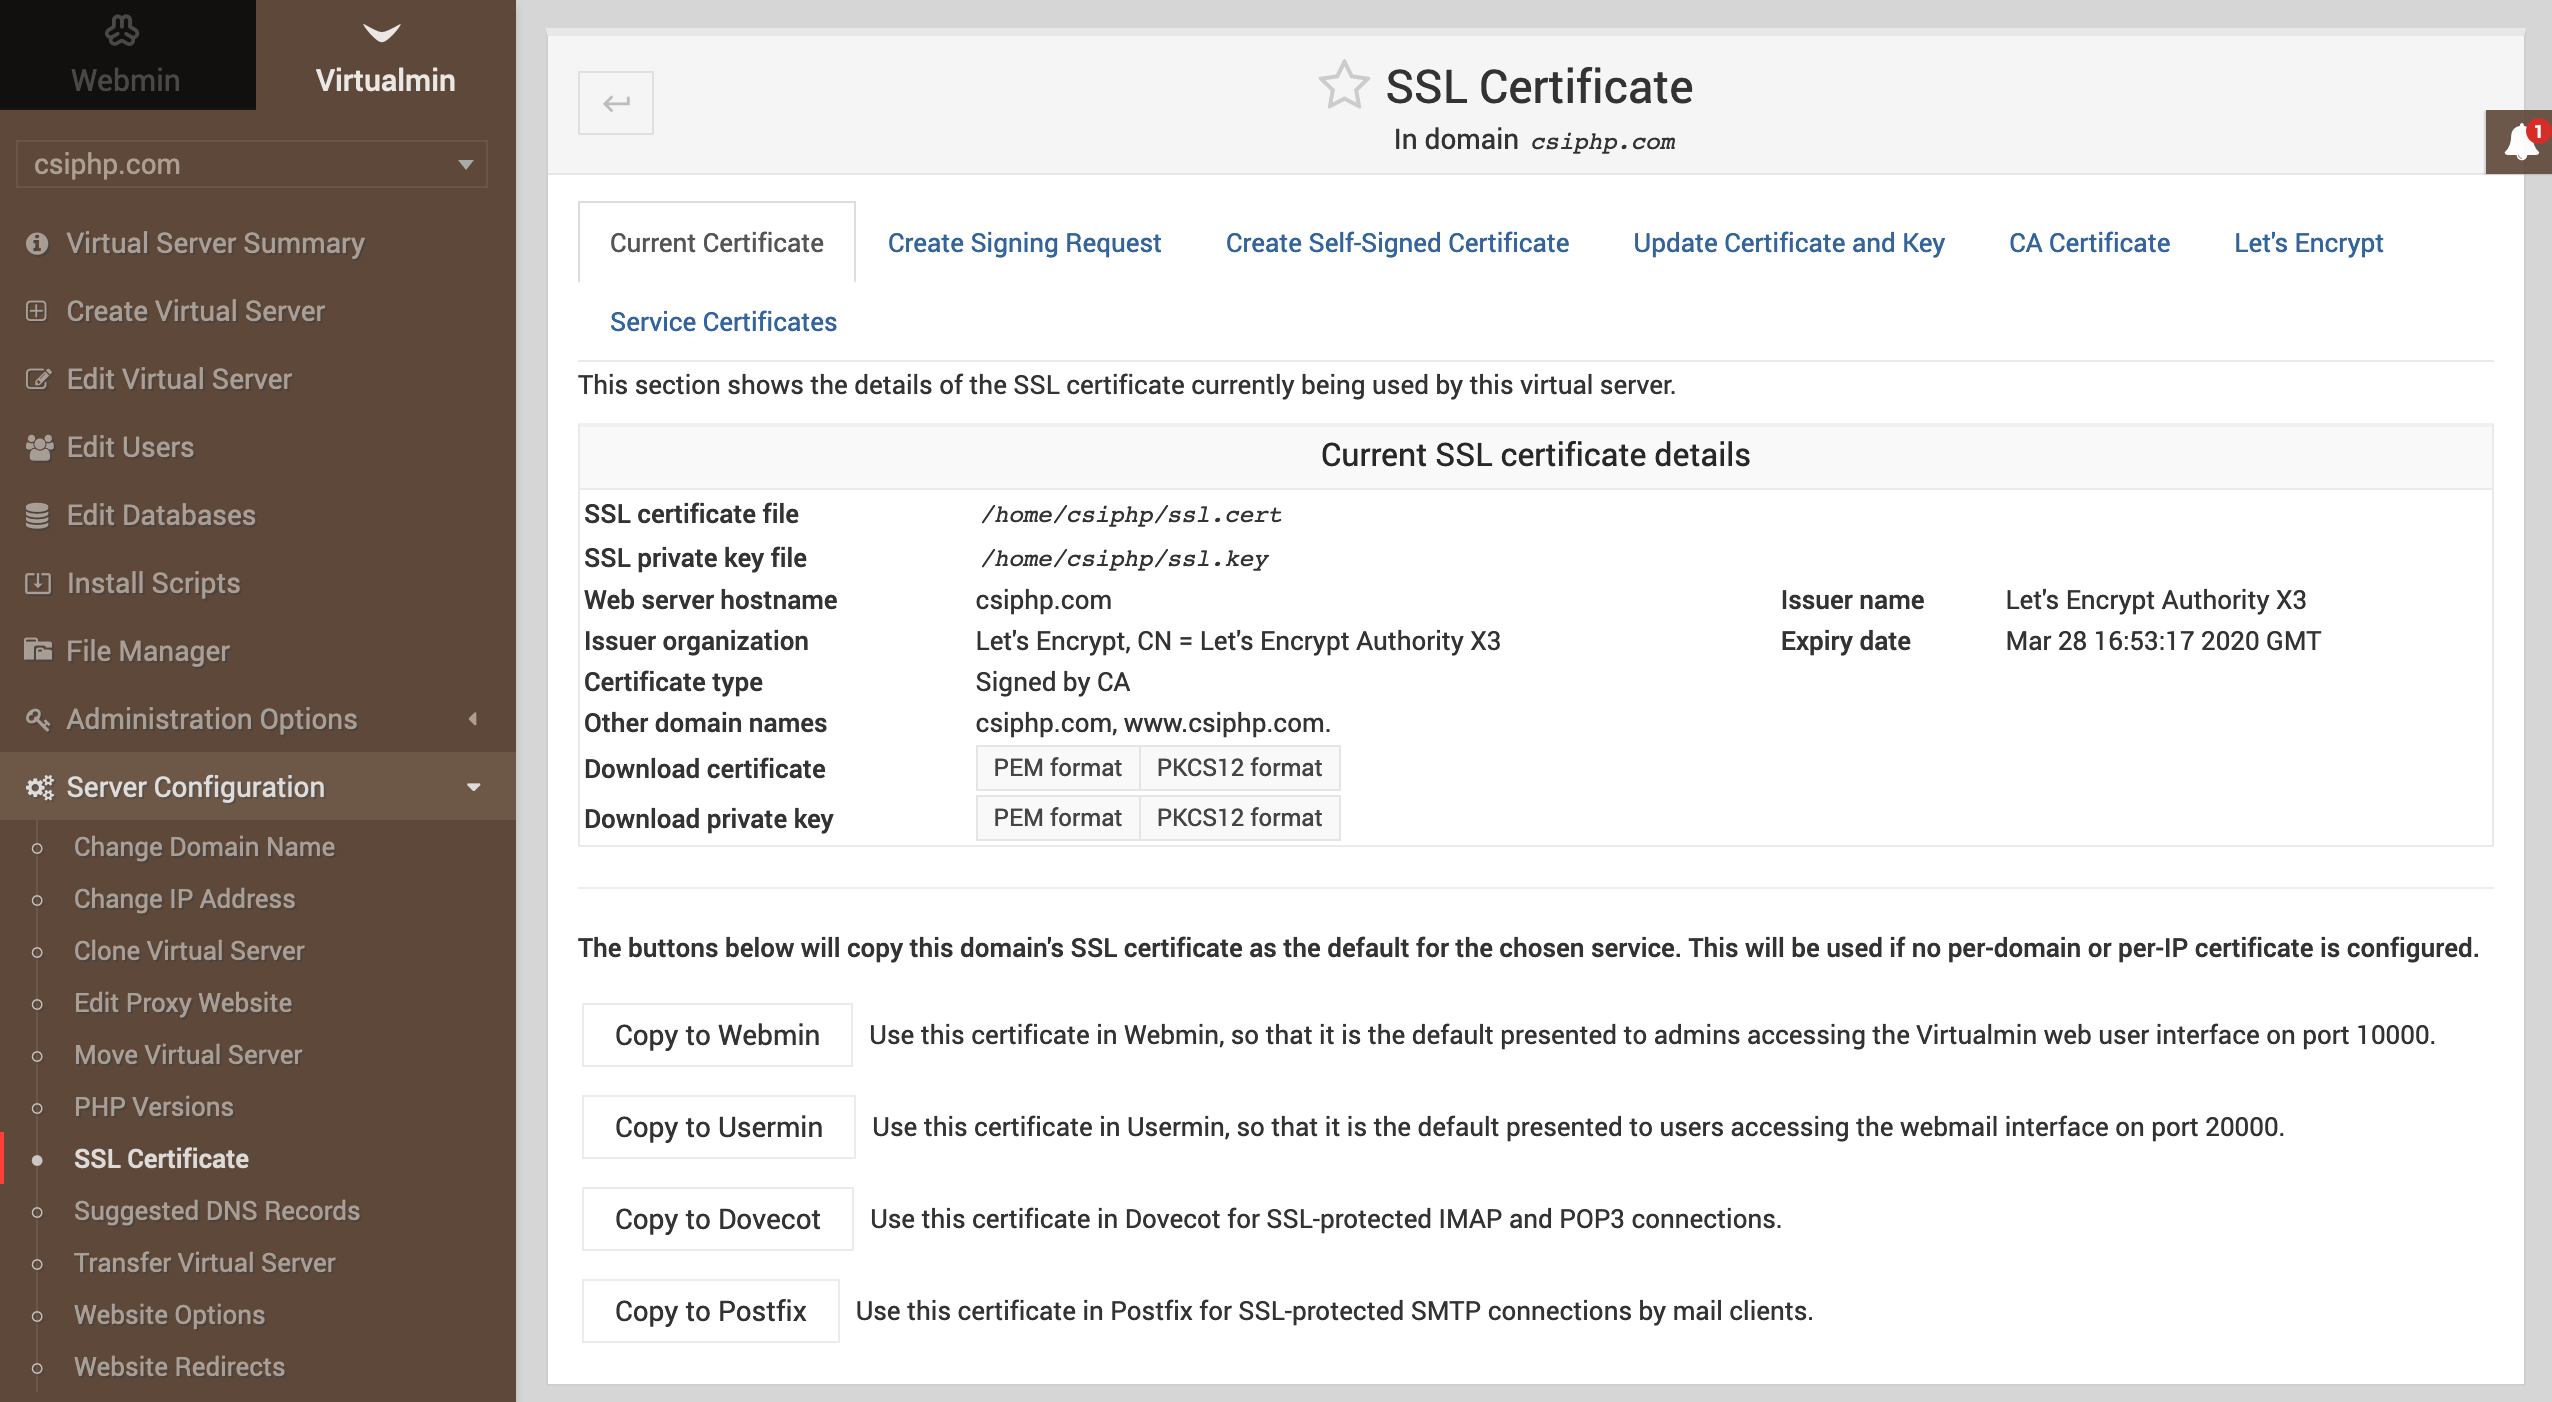
We can see the SSL certificate issued for csiphp.com is valid until March 28: Expiry date Mar 28 16:53:17 2020 GMT If we click on the “Let’s Encrypt” tab you can see the following which we’ve used to create the certificate as well as state that we wait 2 months before automatically renewing the certificate. Let’s Encrypt certificates are only issued for short periods, usually 90 days.
Now we’ve covered everything you need to stand up a LAMP stack on Virtualmin and start hosting your applications. We’ve barely scratched the surface of what Virtualmin can do to make server management easier. Poke around the menus in Virtualmin and Webmin, I often discover new things I hadn’t seen before despite being a long time user.
Happy Hosting!
Warning:
This post content may not be current, please double check the official documentation as needed.
This post may also be in an unedited form with grammatical or spelling mistakes, purchase the March 2020 issue from http://phparch.com for the professionally edited version.
As Seen On
Recent Posts
- PHP to Rust via Copilot
- Compiling Python 3.12 from Source Tarball on Linux
- HTML Form Processing with PHP - php[architect] Magazine August 2014
- The Workshop: Local Dev with Lando - php[architect] Magazine November 2022
- Getting back into the swing of things
- All Posts
Categories
- ansible
- apache
- applesilicon
- aws
- blackwidow
- cakephp
- community
- composer
- conferences
- copilot
- data-storage
- day-job
- devops
- docker
- fpv
- general
- github
- givecamp
- homestead
- jigsaw
- joindin
- keyboard
- laravel
- learning
- linux
- maker
- mamp
- mentoring
- music
- nonprofit
- opensource
- packages
- php
- phparch
- projects
- provisioning
- python
- razer
- rust
- s3
- security
- slimphp
- speaking
- static-sites
- storage
- testing
- tiny-whoop
- today-i-learned
- training
- ubuntu
- vagrant
- version-control
- windows
- writing
- wsl
- wsl2
- zend-zray