The Workshop: Ansible in Practice - php[architect] Magazine January 2020
Joe • December 1, 2020
ansible learning phparch writing phpWarning:
This post content may not be current, please double check the official documentation as needed.
This post may also be in an unedited form with grammatical or spelling mistakes, purchase the January 2020 issue from http://phparch.com for the professionally edited version.
The Workshop: Ansible in Practice
This month, we're going to dive into a practical application of Ansible by building a playbook with roles to implement a fully functional Linux, MySQL, PHP, and NGINX web server. By the end, you should be able to take the playbook we build together and extend it to suit your requirements.
To follow along or review any parts of the playbook we're building, you can clone the repository.
Last month in "The Workshop: System Management With Ansible,"---see Related Reading---we covered the basics of running Ansible on our machines (control nodes) to configure remote systems (managed nodes). We covered inventory files to describe our managed nodes and how we can group tasks into roles and then into larger playbooks to apply our desired state of the remote systems. We built our first playbook to bring the Ansible basic concepts together in an easy to understand example.
Setting up a managed node
Recall that a managed node is a remote system we configure with Ansible. For this project, we're going to use a local Ubuntu 18.04 server via Vagrant. If you prefer to use a cloud-hosted system, feel free to use your host's IP in place of the IP we use for our Vagrant virtual machine. If you want to use the included Vagrant machine, you'll need Virtualbox 6.x installed as well as Vagrant 2.x.
To start up our managed node run vagrant up from the root of our repository. You may need to select a network device to use for the virtual machine; to ensure we have internet connectivity, you'll want to select whichever device is your primary internet connection. My MacBook Pro system has several network devices, but since I'm connected to my home network via WiFi, I'll select en0: Wi-Fi (AirPort) to use and the virtual machine will share this device with my Mac and appear on my network as it's own system. We need to find out the IP address our network assigned the Vagrant machine by running vagrant ssh to SSH into the VM, then run ifconfig and look for a device named eth1 which reports 192.168.1.135 on my network. This is the IP we'll use in our inventory file in our Ansible playbook.
Configuring Our Inventory File
We need to specify our managed node in our inventory file located at ansible/inventory/local.ini in our project. We'll keep it simple for now with the following contents:
[webservers]
web-01.domain.tld ansible_host=192.168.1.135
Make sure you update the ansible_host value to the IP of your managed node, or else Ansible will be unable to connect and show your host as unreachable when attempting to run the playbook.
Configuring Our Playbook
Last month, we created a basic playbook and a user-accounts role to create a user to run our application. We're going to reuse the playbook and role as our starting point. Our playbook is located at ansible/server-setup.yml. We'll add our role and start a new role named common, which is where I typically do initial system customization, such as allowing/disallowing ports in the firewall and installing any base packages I expect we'll need.
ansible/server-setup.yml:
---
- name: Set up a LAMP server
  hosts: webservers
  remote_user: vagrant
  become: true
  vars:
    - application_user: appuser
    - application_url: ourapplication.test
    - application_path: /home/appuser/public
    - production: no
    - staging: no
    - development: yes
  roles:
    - common
    - user-accounts
    - application
    - php
    - nginx
    - mysql
Our common role starts quite basic, and we'll expand upon it as we need; for now, we're listing out several packages we want to ensure are installed in the managed node.
—--
- name: Install common packages
  apt:
    state: present
    force_apt_get: yes
    pkg:
      - bash
      - bc
      - openssl
      - libssl-dev
      - libssl-doc
      - git-all
      - vim
      - htop
      - ntp
      - curl
      - parallel
      - libreadline-dev
      - ufw
      - software-properties-common

- name: Allow connections through the firewall
  ufw:
    rule: allow
    port: "{{ item }}"
    proto: tcp
  with_items:
    - "80"
    - "443"
Our ansible/roles/common/tasks/main.yml file makes use of apt and pkg modules to loop over a list of packages to pass to the apt module in Ansible to install packages. This is the preferred way to declare packages to be installed, so the system will execute fewer calls to the package manager, which results in a faster run time of our playbook.
To ensure a list of packages is not installed, you can take the same code block and change
state=presenttostate=absentto have the Apt package manager remove the listed packages when the playbook is executed.
The next section named "Allow connections through the firewall," tells the UFW firewall we just installed to open ports 80 and 443 to TCP traffic so users can access our web server.
In this case, I left out SSH since we aren't doing any configuration on the service. You don't have to include port 22; UFW doesn't allow this to lock yourself out as is. The best practice would be to put port 22 on this list explicitly.
Installing and Configuring PHP
To install and configure PHP, there are a few steps we'll take:
- Install the PHP packages.
- Configure our
php.inifor the command line PHP for use - Configure our
php.inifor the FPM PHP service for use. - Configure extensions.
Our php role file structure is shown in Figure 1.

Our ansible/roles/php/tasks/main.yml begins with adding the ondrej/php Apt archive for us to install PHP from. This allows us to use the most recent version of PHP. Then, we'll install PHP packages and include tasks to configure our php.ini files and our extensions.
ansible/roles/php/tasks/main.yml with an abbreviated list of PHP packages:
---
- name: Add ppa:ondrej/php
  apt_repository:
    repo: ppa:ondrej/php

- name: Install PHP Packages
  apt:
    state: present
    force_apt_get: yes
    pkg:
      - composer
      - php-imagick
      - php-memcached
      - php-redis
      - php-xdebug
      - php7.4

- include_tasks: setup-cli-php.ini.yml
- include_tasks: setup-fpm-php.ini.yml
- include_tasks: setup-extensions.yml
To update the existing php.ini files, we'll use the lineinfile ansible module. This module allows us to search a specified file for a regular expression pattern and substitute the found line with our own. We'll use this to set various options such as error_reporting, memory_limit, and more:
---
- name: Set error_reporting on CLI
  lineinfile:
    path: /etc/php/7.4/cli/php.ini
    regexp: "error_reporting = .*"
    line: error_reporting = E_ALL

- name: Set display_errors on CLI
  lineinfile:
    path: /etc/php/7.4/cli/php.ini
    regexp: "display_errors = .*"
    line: display_errors = On

- name: Set memory_limit on CLI
  lineinfile:
    path: /etc/php/7.4/cli/php.ini
    regexp: "memory_limit = .*"
    line: memory_limit = 512M

- name: Set timezone on CLI
  lineinfile:
    path: /etc/php/7.4/cli/php.ini
    regexp: ";date.timezone.*"
    line: date.timezone = UTC
While it makes sense in our php.ini for us to search and replace, it may not always make sense. Consider the case as setting up PHP extensions, which may not have existing files such as the case for OPcache and Xdebug extensions. We can use Ansible's template module to render these files on the managed node from Jinja2 template files in our role:
ansible/roles/php/tasks/setup-extensions.yml:
—
- name: Set our xdebug FPM ini
  template:
    src: xdebug.ini.j2
    dest: /etc/php/7.4/mods-available/xdebug.ini
  notify: reload php-fpm

- name: Set our opcache FPM ini
  template:
    src: opcache.ini.j2
    dest: /etc/php/7.4/mods-available/opcache.ini
  notify: reload php-fpm
You may prefer not to edit the stock PHP INI files. On most distributions, you can drop custom INI files to a folder, and PHP will load them. Name it something like
999-local.inito ensure it loads last and overrides previously set values. To figure out the path, look at the output ofphpinfo()for "Scan this dir for additional .ini files." In Ubuntu, the directory should be something like/etc/php/7.4/conf.d.
Our template file ansible/roles/php/templates/xdebug.ini.j2 doesn't utilize any variables so the j2 extension is optional. However, I prefer to treat all files in the templates/ folder as if they could contain variables, so I keep the extension as it is, with the following contents:
xdebug.remote_enable = 1
xdebug.remote_connect_back = 1
xdebug.remote_port = 9000
xdebug.max_nesting_level = 512
xdebug.remote_autostart = 1
This file is rendered as we see it above, into the destination on the managed node located at /etc/php/7.4/mods-available/xdebug.ini.
Installing and Configuring NGINX
Compared to our php, the role to install and configure the NGINX web server is much simpler:
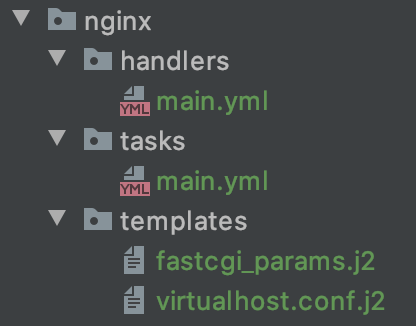
With only a handful of tasks, it makes sense to keep everything in the same ansible/roles/nginx/tasks/main.yml file. The steps we need to take are to:
- install the NGINX package, remove the default site,
- set up some parameters,
- change the user we run the web server as,
- then configure our virtual host for our application.
Here is an abbreviated content of the nginx role's tasks/main.yml:
~~~{.yml)
name: Install Nginx apt: state: present force_apt_get: yes pkg:
- nginx
name: add the app user to the www-data group user: name: "{{ application_user }}" group: www-data
name: Remove Default nginx Site file: path: /etc/nginx/sites-available/default state: absent
name: Setup nginx user to our appuser lineinfile: path: /etc/nginx/nginx.conf regexp: "user www-data;" line: "user {{ application_user }};" notify: reload nginx
name: Setup www-data user to our appuser lineinfile: path: /etc/php/7.4/fpm/pool.d/www.conf regexp: "user = www-data" line: "user = {{ application_user }}"
name: Setup our application virtualhost file template: src: virtualhost.conf.j2 dest: "/etc/nginx/sites-enabled/{{ application_url }}.conf" notify: reload php-fpm
The important thing to note from the `ansible/roles/nginx/tasks/main.yml` is we're setting the user which runs NGINX as our `application_user` variable. Also, our virtual host template uses the `application_path` variable to specify where our site's files are.
# Installing and Configuring MySQL
Installing and configuring MySQL will leverage the same Ansible modules we’ve used in each of our previous roles. We're relying heavily on these Ansible modules:
* `lineinfile`
* `template`
* `file`
* `apt`
The more comfortable you become with these modules, the faster you'll feel right at home with Ansible.
For our MySQL configuration, we want the basics. We'll install the server, set the passwords to never expire for users, set up a `my.cnf` file so our application user can easily log in to MySQL from the command line, and we'll create a user and a database for our application (Figure 2).

The MySQL role's task is located in `ansible/roles/mysql/tasks/main.yml` and contains the following to accomplish our configuration:
~~~{.yml}
—
- name: Install MySQL-server
apt:
state: present
force_apt_get: yes
pkg:
- mysql-server
- python-mysqldb
- name: Configure MySQL Password Lifetime
lineinfile:
path: /etc/mysql/mysql.conf.d/mysqld.cnf
line: default_password_lifetime = 0
create: yes
- name: Set my.cnf for Application User
template:
src: my.cnf.j2
dest: "/home/{{ application_user }}/.my.cnf"
- name: Configure MySQL Remote Access
lineinfile:
path: /etc/mysql/mysql.conf.d/mysqld.cnf
regexp: "bind-address.*=.*"
line: "bind-address = 0.0.0.0"
notify: reload mysql
- name: Create a new database
mysql_db:
name: “{{ application_user }}”
state: present
- name: Create a MySQL user
mysql_user:
name: “{{ application_user }}”
password: “{{ application_user }}”
host: localhost
priv: "{{ application_user }}.*:ALL"
state: present
- name: Removes anonymous user account for localhost
mysql_user:
name: ""
host: localhost
state: absent
We use two new modules here to add a database user mysql_user and mysql_db to create a database for our application. We're using the same value for our username as our password, which isn’t a good practice at all. For keeping your secrets out of version control, we’ll cover Python environments as well as briefly mention two other options.
Running the Playbook
Now we're ready to run our playbook against our managed node. Once you have run vagrant up from the root of the project, you can run the following command to apply the playbook to the Vagrant virtual machine.
ansible-playbook -i inventory/local.ini server-setup.yml
An example of the output you should see is below in Figure 3:
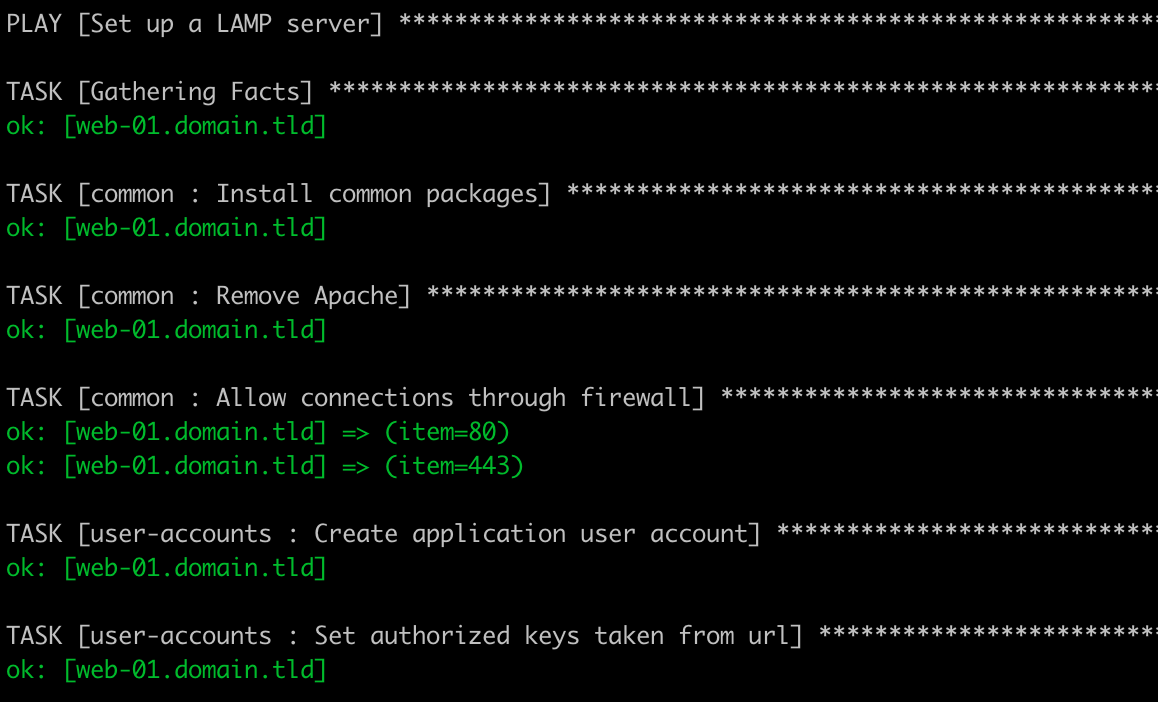
If you’re interested in the full log output, you can view the playbook-output.log included in the project for the full output of the playbook command.
Keeping Your Secrets out of Version Control With Virtual Environments
“Snakes. Why did it have to be snakes?”
In the 1981 theatrical masterpiece "Raiders of the Lost Ark" our hero, Indiana Jones, played by Harrison Ford, prepares to enter a freshly discovered archaeological dig site by dropping a lit torch to the bottom of the pit to see how deep it is. When the torch hits the ground, we see the ground is covered in snakes. "Asps, very dangerous," as we find out right before our hero repels down into the pit. I mention snakes not only because Ansible is written in Python, but keeping your secrets in your version control system is as dangerous as asps. We’ll use virtualenv, a package that lends itself very well to keep your secrets out of your source control repository.
Don't worry, if you hate Python, we're not diving too deep. We're going to do just enough to set up our virtual environment so we can safely keep our secrets out of our playbook. Python virtual environments are very similar to what PHP developers would think about as the .env file in their project where environment variables are declared. If this file were combined with the vendor folder, this would be the same as what Python virtualenv provides.
You may already have Python 3 on your system. Most likely, you have Python 2.7, which is the equivalent faux pas of running PHP 5.4. You can install Python 3 easily via the official downloads. Once installed, you should be able to run which pip3 and see a path to the pip3 executable (for me pip3 is located at /usr/bin/pip3). This is the Python package manager application similar to Composer.
Before we can create a virtual environment, we need to use Pip to install the virtualenv package via:
$ /usr/bin/pip3 install virtualenv
It may be necessary for you to run sudo to install virtualenv, which is acceptable. The next step is to find out where our python3 executable is located: which python3; on macOS, the file is /usr/local/bin/python3. Take a note of this path and use it from the root of our GitHub project you cloned earlier to run the following command.
$ /usr/local/bin/python3 -m venv env
$ source env/bin/activate
$ which python
/Users/halo/Code/AnsibleInPractice/env/bin/python
$ python —version
Python 3.6.8
The first command we ran told our specific version of python3 to create a new virtualenv in a folder named env which now exists in the repository we cloned. The next step is to "activate" the environment we just created. We can verify we're now using Python from our virtual environment by running which python; we can see the Python executable is now located in our env/bin folder. To verify our version is what we expect, we run python —version to see we're running 3.6.8.
Instead of composer.json, Python uses requirements.txt as its source of dependencies for a project, which can be installed by running pip install -r requirements.txt. Once complete, we can breathe a sigh of relief as we're done with Python! We now have access to the ansible executable from within our virtual environment: env/bin/ansible.
All of this virtual environment configuration and set up now allows us to source variables from the environment into our Ansible tasks. This is especially useful for secrets such as passwords, API keys, tokens, and anything else which shouldn't be shared in version control. We can simply add these values to our env/bin/activate script:
~~~{.txt}… _OLD_VIRTUAL_PATH=“$PATH” export API_KEY=“1234567890” export PASSWORD=“hunter2” PATH=“$VIRTUAL_ENV/bin:$PATH” export PATH …
In the example above, we've added `API_KEY` and `PASSWORD` environment variables to our virtual environment. We can use Ansible's `env` module to retrieve those values in our playbooks such as the following example which uses the `slack` modules to send a message to Slack :

~~~{.yml}
- name: Send notification message via Slack
  slack:
    token: "{{ lookup("env","API_KEY") }}"
    msg: "keeping our secrets secret!"
    channel: "#ansible"
    username: "Ansible"
    icon_url: http://www.example.com/some-image-file.png
If storing sensitive information in environment variables is completely absurd to you, check out Ansible Vault which changes how you edit encrypted files, via the ansible-vault CLI, which encrypts your secrets in a file and is sourced by Ansible. You could also leverage git-crypt to keep your secrets encrypted at rest in your version control system and decrypt them on your local system.
Go Forth and Configure!
Now that we’ve stepped through a real-world playbook to configure a Linux system into a PHP application server, you’re ready to take the next step in your Ansible learning journey and start building playbooks. Feel free to copy and tweak the examples here. You can find the complete playbook on GitHub. Happy Configuring!
Warning:
This post content may not be current, please double check the official documentation as needed.
This post may also be in an unedited form with grammatical or spelling mistakes, purchase the January 2020 issue from http://phparch.com for the professionally edited version.
As Seen On
Recent Posts
- PHP to Rust via Copilot
- Compiling Python 3.12 from Source Tarball on Linux
- HTML Form Processing with PHP - php[architect] Magazine August 2014
- The Workshop: Local Dev with Lando - php[architect] Magazine November 2022
- Getting back into the swing of things
- All Posts
Categories
- ansible
- apache
- applesilicon
- aws
- blackwidow
- cakephp
- community
- composer
- conferences
- copilot
- data-storage
- day-job
- devops
- docker
- fpv
- general
- github
- givecamp
- homestead
- jigsaw
- joindin
- keyboard
- laravel
- learning
- linux
- maker
- mamp
- mentoring
- music
- nonprofit
- opensource
- packages
- php
- phparch
- projects
- provisioning
- python
- razer
- rust
- s3
- security
- slimphp
- speaking
- static-sites
- storage
- testing
- tiny-whoop
- today-i-learned
- training
- ubuntu
- vagrant
- version-control
- windows
- writing
- wsl
- wsl2
- zend-zray